CNYBrew.com

Wednesday, May 23, 2007

I found the culprit...it was me!

As always, the explanation is usually something simple. This situation is nonetheless the same.

In the post about my brew day I noted that my OG was much higher than planned and I was not sure why. I had assumed that my tweaking of my brewing techniques had increased my efficiency 10 fold! But alas that was not the case.

It turns out my wort was on "Gravity Enhancing Substances" namely an extra 1/2 lb of Belgium candi sugar I mistakenly dumped into the brew pot.

After reading Ted's Home Brew Journal where he had had a similar freak occurrence and telling him my theory of the earths magnetic polar shifts and how it is now effecting my gravity readings (because there is no way I could f%&* up my recipe on brew day!), I revisited my recipe. In doing some math on a fancy pants brew calculator (that I am a HUGE fan of BTW) I noticed that my recipe called for 1/2 lb of candi sugar as opposed to the full pound that I added, eureka! Just the breakthrough I had been waiting for! We can all breath easy and go back to calling Al Gore the lying bastard that he is ;-)

Anyway, all kidding aside, simple answer. I think that coupled with my 1/2 assed gravity readings gave me my variation. I am not crying in my beer though, god knows there are worse things than beer that's a little stronger than you intended.

I need to get back to brewing with some patience. My brewing, like my golf game, needs to take as long as it needs to. Regardless of interruption. It's time for me to get back to allocating the time needed to make this happen.

Cheers!

Wednesday, May 09, 2007

Loving Californication


This is a late review of my Californication, but I have had a good chance to sample enough of it now to formulate a good opinion of this beer.

I have to say, I was a bit weary about this beer at first as I am not crazy about the "lager" taste that is the mark of lager yeast. I was not sure how that would blend with the recipe I made or if it would be overwhelming. Well I was very pleased with the flavor and the subtle nuances of this beer. Here is my assessment without any scoring:

Appearance: Pours medium copper color with a long lasting head. The head is really think and creamy and lasts quite a while. I think this is the result of the DME conditioning because I have never had a brew do this before.

Aroma: This has a very clean smell, a lot of malt without a lot of hops. There is a little hint of the Larger aroma, but it is second or third on the list of things I would say I can smell.

Taste: There is a light sweet flavor that is anything but overwhelming. It's subtle and stays on the tongue without dominating the experience. There is a touch of bittering at the end of the experience, but it passes fast and you are left with the subtle sweet carmel flavor (again, very subtle)

Mouth Feel: This is a very smooth beer. The carbonation is in line with the style being average for high drinkability.

Drinkability: This is one of the more drinkable beers I have ever brewed. It's smooth and refreshing with the ABV to make it a session beer. It has the body and character of a bigger beer, but stops shot of being overwhelming making you want more!

Conclusion: This is without a doubt one of the best beers I have brewed. It may be the style that I am growing attached to, but these days when a lot of brewers are really focused on big intense flavors, this is really refreshing. The American Lager I made was too little, the ESB, maybe a little too much, this is the baby bear, it's just right!

* For the record, I am wearing a golf glove because I took those pics on the way out to practice my short game in my back yard.

**Yes, I am anal and wear my glove when practicing in the yard, but not my shoes, I am not that anal.

Monday, May 07, 2007

Beautiful Day to Brew!

My thoughts and prayers are with everyone in the mid-west who have been effected by the tornado's. I lost my house to fire and I know how it feels to have to pick up the pieces, things will get better with time.

With that said, we were fortunate this weekend in the North East to have an albeit breezy, but sunny day in Upstate New York. Sunday I took advantage of the weather and brewed the crowd favorite Mulligan Wit.

Here some some items of note from the brew day:


  • I made a starter that I cooked a little hot and it boiled over in the stove.
    It's also had some of the DME scorched the bottom of the flask (first time using
    my flask, kind of a pain in the arss).
  • Started brewing at 8:30am, finish time 2:30pm, 6hr brew session.
  • I heated the mash water up to 175F and it leveled out at about 154F when it was in the mash tun. One item of note was that I got two different readings from the
    thermometer, I usually stick it into a tiny hole I have in the top of the mash
    tun, and it was saying 160F, when I put the thermometer into the mash, it was
    154F. I am assuming that this is because the steam is so hot in the mash tun.
    Take note for future batches.
  • The gravity of the mash was 1.060 without any adjustments to compensate for heat. I need to make sure that I start cooling these off more from now on.
  • I sparged at 175F and had two rests in the sparge. By the time I was done with the sparge I had used 5.5 gallons of sparge water and 4.5 gallons of mash water.
  • The beginning boil OG of the wort was 1.040, this was again without adjustment to temp.
  • I used a fine grain bag as a way to keep hop loss to a minimum. I also used this for all of the other items on the list for this recipe.
  • The boil went for about 1hr and 20 min., the end yield was 4.8 gallons.
  • The OG was 1.059, a whole .010 over my target at 1.049 so I added water
    and stirred it a while. I got it down to 1.052 and called it good.
  • I pitched at 74F and it was bubbling within 24hrs very actively!


It was a successful brew day. I doubt I will enter this one into any competitions as it's more of a brew that I enjoy than anything. I just hope that I am going to be able to get it close to what I had last year.

Cheers!

Tuesday, May 01, 2007

The Return of the Mulligan

So I thought that the best way to wake my senses back up was to brew...so away I go. This is an all-grain interpretation of the Blanche de Bruges (Belgium White) that we coined Mulligan Wit after a piss-poor day of golf. I considered going safe and just making another extract brew, but I am always one for a challenge so here goes.


Grain Bill:
2 Row Pale Malt (Mutton's US)- 7.43 lbs
Flaked Wheat- 5.76 lbs
Biscuit Malt- .14lbs
Flaked Oats- .27lbs
Clear Candi Sugar- .5 lbs (45min)


Other:

1.5 tsp Ground Coriander (15min)
1.5 oz Bitter Orange Peel (1/2 @ 15min 1/2 @ 3min)
1/2 tsp Crushed Cumin Seed
1.5 tsp Crushed Grains of Paradise


Hops:

1oz Saaz (3.75% AA) 60 min
1oz Styrian Golding (5.25% AA) 30 min


Yeast:

Belgium White Beer Yeast

OG: 1.052
FG: 1.009

ABV 5.6%

I made some adjustments to this recipe because I am shooting for a 7 gallon yield. I have been trying to get higher and higher yields and I am barley getting what I need to so I am going to shoot for a little more this time and see where I end up.


If you see anything here that looks out of place, now is the time to let me know because I am not brewing till this weekend!


Cheers!

Sunday, April 29, 2007

Missing a friend


I always wanted to keep all personal dialog off of my blog. It really flies in the face of the objective of this blog. However, in this case, I need a place to vent and this is my medium of choice. I apologize in advance:

This past week I have not been on BA or on this blog because of the very tragic loss of a friend. His name was Travis Lee and he was a 22yr old member of my fraternity. I was one of those guys that has remained active in my house and I have taken the time to get too know the guys up there.

Travis was a member of my family tree and was a great person. Travis had a wild sense of humor and was a boisterous character. You always knew when he was around.

Tuesday morning I got a call from my little little brother Chris, he was noticeably upset. I knew something was wrong from his message, but I had assumed it was an accident of some sort. When he told me that Travis had taken his own life very early that morning it was as if I was punched in the chest. Like most everyone else the news was numbing and was met with stark disblief. How could he have done this, HE WAS 22 YEARS OLD??!!

I called some of the other guys in the house (out of a lack of knowing what else to do) and it was more and more painful the more that I said it. Suicide.

I went to the house that night with my little brother in the house to be with the guys and try and show them some support. Somewhere along the lines I found out that it was a very close friend of mine that found Travis that morning. There were no words for the pain that he was now experiencing. Not only did he loose his best friend, but now he would shoulder the burden of why he had to see what he saw.

I spent the night there, we cried, drank and tried to understand why, but left for home with a hangover and more questions in the morning. The rest of the week I spent on FaceBook and Myspace (many of the newer guys in the house are into those things), looking at pictures and posting messages. Many of them to Travis on his page. This was the last message I got from Travis on Facebook a week before:

Travis Lee (SUNY Potsdam) wrote
at 11:06pm on April 17th, 2007
Hey there T.O.T (The Original Travis)! I had a hell of a time at the wedding with you and the rest of the guys. It was really cool to see what happens to people after they leave P-Dam and become successful. I really admire you man and if you don't mind me saying, your wife is a smoking hot fox. Keep in touch, or Ill just see you Alumni Weekend. Late.

Friday was the wake, still no answers, just more pain...he was buried on Saturday and all we have left is memories. Today was the first day of the rest of everyone's lives without Travis. Questions linger as well as pain, but all we can do is wait. Someday we will all know.

Travis was a great person with great personal pain. No one saw it, or felt it because when you were with him all you felt was the love he had for all his friends. It was only a few weeks ago that we were all together for Chris' wedding. Everything was great. Now he is gone and we all miss him very much. All we can do is remember the love he had for us and the love we have for him.

I am sorry again for my deviation from homebrewing and I understand how difficult this subject is. I appreciate it if you took the time to read this, though I understand if decided to stop.

To Travis, from T.O.T; you have always had and you will always have my love and respect, see you on the other side brother.

Monday, April 23, 2007

Spring Cleaning and the Next Big Thing


So I spent this weekend going through my kegging system and replacing lines, cleaning and making the sensitive balance that it my keggerator flow. For those of you that have not checked out the post that I did on my operation, my keggerator consists of a mini-fridge that holds a cold plate and has a tap on the front. The cold plate sits inside a pan with water in it to keep the cold plate more effective (as cold water penetrates faster than cold air or something like that) and there is a liquid line that runs from the keg to the cold plate and from the cold plate to the tap.

I have had this operation intact for about a year and a half now and it's been great, I could not be happier.

So why am I thinking about upgrading?

This is the internal monster that every homebrewer (and man for that matter) grapples with at every waking moment of his/her lives. To upgrade or not to upgrade? It seems that every time I have my system dialed in and the beer is flowing like wine, I feel the need to monkey around. Don't ask me why, I just do. In this case, I am telling myself that I want to have more beers on tap.

So I have started to look at this little invention I found while looking at BeerAdvocate.com;

http://www.benshomebrew.com/Beer/kegerator.html

As you can see, Ben used a mini-fridge connected to a self insulated wood box with a hole in it to create some flow of the cold air. I found the directions helpful and I am considering making this my summer project. I emailed Ben about this, specifically the temps that he hits with the fridge and he said that it's not cold enough to lager beer. At first I thought this was a deal breaker for me because I have no other way to lager brews during the summer months until the wife game me the green light to fire up the basement fridge!

Now I am seriously considering my own variation on this design that would have one of the taps on the top and two others on the bottom. I have some old countertop that I can use for the top of the contraption and all I need to do is come up with some plywood and insulation. We will see, but with energy costs being the way that they are, this is an attractive alternative to buying a chest fridge.

More to come on this one…

PS- Ben has a store in PA that looks pretty damn nice! I might have to hit it up for my next batch of Mead.

Cheers

Monday, April 16, 2007

Keg Issues **Update**


So last night, while getting prepped to watch the Sopranos, I kicked my keg. The Schlitz is finally all gone and I am almost ready to keg my Californication so I am feeling good about the whole situation. That is until I start to go through my cleaning process.

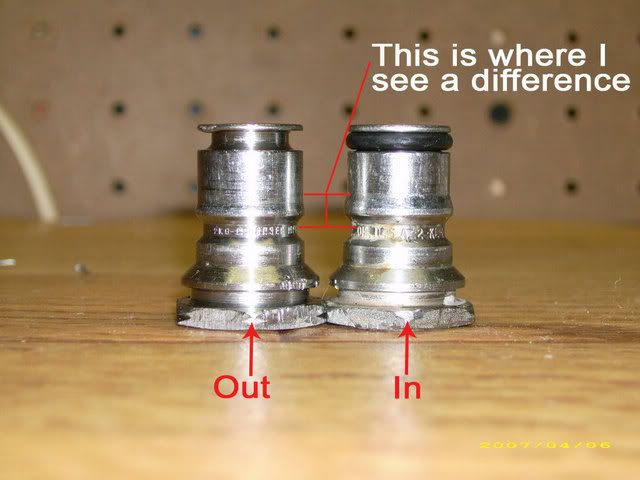
I hosed out the keg and started to reconnect everything so that I could run some clean water through the system. However, when I went to try and hook up my outward bound hose to the out nozzle on the keg, it wouldn't budge. Now this is nothing new, it's always been a fight to get either of the connections on or both, but never like this.

After a while of working at it I figured that something was really long so I cut the line for the connector and took the outward nipple off the keg. After a long time fighting, WD40ing and every other thing I could think of, I decided to take the other nipple off the keg as well. I noticed that my outward bound connector fit like a glove on the current inward nipple and so I tried the visa verse. Sure enough the line from the CO2 tank fit perfectly over the outward nipple.

I have posted a picture above of the two nipples. There appears to be a difference with their shape. I am not sure if this is what is causing my problems or if there is any real difference between the two, but from what I can tell other than the shape differences they are the same.

Last night was the first time I was able to get the outward bound nipple off. It has been stuck on since I got it and it wasn't until last night that I was motivated enough to force it off. So this is the way I got this keg. With that said, it was off the front porch of a rival fraternity that I got this keg while in college, so there is not guarantee on the expertise from which this was setup.

Any thoughts on how this should be setup?

**Update**

Okay, so after a lot of head scratching and completely taking both my keg and all of the parts that connect into and out of it apart everything is working smoothly. The issue? What we call in software as "user error."

I must have been trying to force the liquid ball lock onto the gas nipple. That's the only logical explanation because the nipples cannot be switched. The threads for one are bigger than the other and therefore it was not possible that it was wrong on them. Also when I removed the ball locks from both the gas and the keggerator, I put them back the exact way they were before.

The light at the end of the tunnel is that I got to clean everything top to bottom.

Sunday, April 15, 2007

CNYBrew.com 2.0


I figured since my last post was number 50, I should do something to shake it up so here it is...

Seriously though, I made some changes to the design to and make this a more scalable and navigable website. I loved my old design and I spent a lot of time getting it the way that I wanted it. Blogger Beta came along and I resisted the change for as long as I could because my old design wouldn't work in the new Beta format, but alas, I caved.

The reason for the change was I had tried to reference my site for one thing or another in an email or on a forum post and the person I was trying to help out could not find what they were looking for. I rarely look at my site and try to navigate around it and in doing so, I realized that I had sacrificed the purpose of this site for vanity. So I changed.

I started this site to be an "online beer log" where I would post up my recipes and experience both for my personal reference and for comment from other folks that are interested in homebrewing as well. The inability to navigate to previous posts few in the face of this plan and kept this site from being useful.

I hope you like the new site, listed below were some of the sources where I got code to customize the site the way I wanted it.


  • Custom Header

  • Background Image- This one I figured out myself, just look for the Body tag and look to see if there is a URL or a #6 digit number. If it's a number, just use the cole background: url("theplacewhereyourpicis.com"); and it worked.

  • Fixed background image

  • No Google Nav Bar

I hope everyone likes the new design and doesn't think I fixed something that wasn't broken (hence the ice beer reference).

Cheers!

Wednesday, April 11, 2007

Lessons in Sparging

Last night was my brew club meeting and the topic was sparging. I learned quite a bit, both from the presentation and from some conversations I had afterwards. Here is what I came away with:

  • There are 5 signs to stop sparging:
  1. You run out of sparge water
  2. the PH turns (more or less acidic, not sure what the conclusion was on that)
  3. Gravity reading
  4. taste
  5. color
  • Sparge at 170F, this is hot enough to clean the husks, not cool enough to keep the bad stuff out of the runoff
  • Avoid a stuck mash, keep the grains suspended in the water and be sure that you have as much going out as you have coming in. This way there is no binding up around the filter. All of the grains should be submerged in water at all times.
  • When you are brewing and you start to see the runoff get light in color, shut off the water running in and the run off. Let the mix sit there for 15 to 10 min like that and start again. Repeat this process as a way to make sure that you are getting the most out of your mash.
  • when the gravity starts to drop on the runoff, you can run the remainder into jars and use it for starter in the future.

All in all it was a great meeting for me to go to because I am still a little shaky on the sparging process. I have been completing my sparging a half hour or so and in the future, I need to allow the process to take an hour or so.

Finally, I brought in the ESB I made for some comments. Everyone agreed it was mighty hoppy for an ESB and the malt I used (chocolate at .45lbs, crystal 60L) gave the brew a very pungent malt flavor. Most people that tried it said they thought the malt was roasted barley or biscuit.

With that said, everyone seemed to like even though it was not in a style category. Some people said it was more like an IPA than an ESP, however I would keep away from that because it's a bit dark for an IPA.

Hmmm, dark, bitter...I will call it Mother's ESB after the Danzig song Mother. You don't get much more dark and bitter than that.

Sunday, April 08, 2007

My Version of a Bazooka Screen

Okay, so this is something I have thought about doing for quite some time and am only now getting to it so here we go:

Not too long ago I built my first mash-tun out of a cooler and have been using it ever since. However, my first few batches had some problems because I used a filter I found in this website that was the basis for my mash-tun. You see, the filter that he used and what I was able to find had to be different. Mine was a water connection hose braid, however it was flimsy like cloth and could not hold up so it was giving me a really slow flow. His sounded like a more sturdy hose braid that could be crimped at the end.

After reading Grove's Beer Log about his new mash-tun and the Bazooka Screen he bought, I was inspired. I went out to home depot and bought some window screen and started to work...this is what I came up with.

The screen was in the window section at Home Depot and is was $6 for a lot of it. The good part about buying extra is that I can make other screens if need be. I sized up the length that I would need for it and cut the piece.


I rolled the screen around a small piece of PVC that I had, it was about 1/2" diameter. After I rolled this around the PVC a few times, I pulled the PVC out and picked the size I was going to make the screen. From there I left about 2" on both the beginning and the end of the price of screen and bent it over once to start to make a seem. I used pliers to pinch the seem down. I repeated this process of bending and crimping until I had the screen at the size I wanted. It wound up being about 3 good bends and I cut off all the excess.

From there I slid the screen onto a barbed copper fitting (something most people who have a home brew system are probably familiar with) and affixed it with a small screw-tight clamp.

*as you will note, I cut very small pieces of the PVC and slid them into the screen to reinforce them and act like ribs, I am not sure how much this really helps, but it doesn't hurt.


From here I cut the filter to length and crimped the end the same way that I crimped the edge, by folding and clamping.


In the end, the whole process was only about 1/2 hr of work and because I had some of the extra parts lying around it only cost $6 for the screen (which I still have about 90% of). If anyone were to do this, I would recommend a good pair of gloves and a place that you don't have to worry about making a mess of. Those little wires poke the hell out of your hands and get everywhere. Otherwise it's cake.
Good luck, cheers!

Tuesday, April 03, 2007

Meth Lab in my basement (*Updated!)


Got your attention right? I was looking to do a Mead using honey and some fruit (Cyser) and I got a recipe from a buddy on Beer Advocate that was for a Metheglin. I brewed this up without any cooking, heating or much else. It was quite easy and I made about 2 gallons of the stuff.

I am not going to be publishing the recipe as I told the author I would keep it on the down low. However, here are a few of my notes from that short brew day:

- After prepping all of the ingredients (some spices and ginger) along with cider and honey (that was from a local farm) I basically threw everything together and stirred for a while to aerate the mix.

- Me being the rocket surgeon that I am, I decided to put the cider in the fridge after I bought it and it was cold when I mixed everything. So I put my bucket into a sink with warm water until I got it up to room temp.

- I activated the tried yeast according to the directions and it did not seem to cause any problems. I am going to take a reading at the end of the week and see how I am doing.

- The OG was in the 1.200 range and should pan out to a nice strong drink. They say that it will take upwards of 6months for full maturation, so I get to wait on this.

I am going to bottle this up into 4 growlers when it's all said and done and it should be pretty good. I was put onto a great website called GotMead.com that has a lot of really useful information.

Cheers!


**Update**


So after the first week I took another gravity reading and there was no activity. I decided to stop of at EJ Wren's (my homebrew supply) and get a couple of extra packs of yeast to try and jump start this and Ed told me that I should get some Pectic Enzyme (like started fluid for your yeast according to him) and some Fermax Yeast Nutrient (like fertilizer for your yeast) to add into the mix.


I re-pitched last night after adding 1tbs of Pectic Enzyme and 2tbs of Fermax. I am still waiting on some results, but I think this might do it.


*one correction to make to the previous entry, the OG was not 1.200's, it was 1.100, I had taken the original reading a few days after I pitched and figured there was some action and tried to figure the difference, I had meant 1.120, but that was wrong as well. Anyhoo, it's a 1.100 for an OG and I am hoping for a lot of activity in the next few days.
** My wife has been asking me to name a brew after her so this will be Christa Meth!

Saturday, March 31, 2007

Dream of Californication

I decided my next brew should be a California Common. This is what I call Californication:

Pale Malt- 2 row US 10.3 lbs
Crystal Malt - 40L 1.5lbs

.5oz Northern Brewer- 60min
.75oz Centennial - 30min
.5oz Norther Brewer 10min

1/2 tbs Irish Moss

Wyeast California Larger

OG- 1.050
FG- 1.010

**Racked it 6 days after I brewed it

I just brewed this today so here are a few things to take note of on this brew:

-I did a yeast starter for this one, though there is some discussion on weather or not a starter is needed with Wyeast and a brew under 1.065, but I still did it. I used my wine bottle with about 2 1/2 cups of water and about 3/4 cup of extra light DME and boiled it for 15-20 min (this was done at about 9pm night before brew day). It started to bubble by the morning and it continued to bubble until I pitched it.

-Over headed Mash water to about 170ish, I added ice and let it sit with the lid open on my mash tub until it got down to 158f. Once at 158f I let the mash go for an hour.

-I went by the 1.5 qts water for every lb of grain giving me a mash water of 4.5 gallons. I may want to cut that back to 1.25qts/lb or even 1 qt/lb next time because I did not use all of my sparge water (input welcomed on this point)

-Fly sparged this batch fully successfully. I used 5.75 gallons for the sparge, but wound up dumping out about 1 gallon or so.

-My last gravity reading was 1.046 and I was shooting for 1.050 so I let it go on a rolling boil for about 15-20 min before adding the 60 min hops. Before I pitched the yeast it was at 1.050 so I was on the nose for that!

I couldn't be happier with the way today's brew session went. I am about 1/2 dozen (maybe 1/2 a bakers dozen, but who is counting) brews into all-grain brewing and I finally have a really good handle on whats going on. This took me about 5 1/2 hrs from start to finish so I am even doing it in pretty good time as well.

I am going to bottle 3 or 4 of these and enter it into a contest. I figure since I am hitting my targets on my brews now I am ready to get some feedback. Either way, it's nice to know the investment in time to come up with some methods that allow me to make the recipes I am trying for has paid off.

Cheers!

Saturday, March 24, 2007

Bottled Mother's ESB

Today was my day to bottle the ESB and take the final gravity. Now I say bottle because I picked up some growlers from my Brother-in-law at his eBay store:

http://cgi.ebay.com/ws/eBayISAPI.dll?ViewItem&item=220065864894

I wound up getting 18 of them because I wanted to start having some brew to take with me places. These worked out well with this batch because I didn't wind up with the 5 gallons I was shooting for. This was the result of all the hops I used in the process and the lack of any filtration out of my brew kettle. I lost a whole gallon's worth of ESB from all of the hops I had to dump out. Oh well, live and learn.

Anyway, I took my FG and it was 1.010 making this a 6.5% ABV wonder. I drank the gravity sample and I was a little turned off because there was a strong alcohol burn, but otherwise it was quite good.

I am hoping that a little bit of time will cure the issues with the burn. I will be sure to write on the growlers, but so far they are great and it's not easy to find the amber ones, so that's a bonus.

Cheers!

Tuesday, March 20, 2007

Quick Tech Note

This one is for the other bloggers and tech folks out there. I have set up an email for the new domain that I have, this email is travis@cnybrew.com so anyone who is so inclined is welcome to email me.

I used the new Windows Live Custom Domain that is part of the Windows Live set of features. I think it's in beta, but it's looking like a very useful service. Tech Crunch did a good write up of the service and I have to agree.

The way that it works is you set up a MX record with your domain host and delete any of the other MX records on the account. You then create a TXT record and the changes only take a few minutes to take effect. From there you hit refresh on the Windows Live dashboard in the setup pane and you are off.

It sets you up with a free 1 gig hotmail account that is @yourdomain.com and you are done.

There are some drawbacks to the system as it currently works. For example, you have to log out of the account you manage the domains with and log into the email account you just created. So for someone like myself who have a couple of websites I am managing, I have to log out and log in every time I want to check a new email. Also there is no way to create a "catch all" for your domain which is a problem.

Big advantage though, it's free! That means more money for beer supplies!

Sorry for geeking it up. Cheers!

Saturday, March 17, 2007

Thermometer Installation

In my continuing quest to find a financial shortcut to everything, this week I installed a thermometer on my brew kettle. I searched around and found that there are 2 or 3 companies that make these specifically for brewing and to install onto a brew kettle. Let me start by saying that these thermometers have a distinct advantage over the one that I installed here because they are marked with the proper temps for everything you would do with homebrewing.


However, I found this thermometer on eBay for $16 (with shipping and everything it was $25) so I was sold. It did not come with the "all-in-one" installation, but I am always one for a challenge. So this is what I did:


Thermometer $25
Brass Fitting $3.95
2 3/4" brass washers $4
2 1/2" rubber gaskets (had them from before)
Thread stuff (had it from before)
Total $32.95 compared to the $33 for an all in one kit...who's the sucker now!

Anyway, I digress, in order to install this I had to use the step drill bit that I used for the ball valve and make a hole big enough that the 1/2" threaded section of the thermometer would fit in. This was as much of a project as it was the first time and as with before, it was as much of a chore as the whole project combined.


As with the ball valve, I put a washer on this with a rubber gasket on the inside so that it would seal the whole upon tightening. I used the thread stuff (in the background) the make sure that there were not any leaking on the connections.


As you will note from the image on the right, I had to put the thermometer offset to the right of the ball lock because the face of the thermometer was not going to fit flush right above the ball lock. If I had elected not to use the washer, it would have fit, but the washer would have been on the lowest ring and would have not sit flush, so tightening would have been a problem. Initially I was a little distraught, but then I remembered that this was MY brew kettle and as long as I didn't care, it was perfect.


Finally I tested it for leaks overnight and it was a slam dunk! I even got the dial on straight (after a few tries) so it's a totally functional brew kettle.


I am going to right a review of the thermometer on the first time I use it because it was reading some wacky temps when it was first installed, but once it got settled, it was fine...we will see.

Cheers!

Thursday, March 15, 2007

Quick update on the Mother's ESB

I racked yesterday which seemed a little soon, but the bubbling had stopped a day or so before. When it was going, it was aggressive. I took a gravity reading and it was at 1.012 (from 1.060) so I have to say it's right on the money.

One thing I have to say though is my overzealous use of hops cost me some quantity. The hops at the bottom of the bucket was so thick, I couldn't save a bunch of the brew so I lost a little bit. I will have to adjust my recipe appropriately for the next time I dry hop or get really aggressive hopping sessions.

Otherwise I cannot wait on this brew. It smells great and has a nice dark hue that should lighten up to a rich deep copper once it's in my glass. With about 6 1/2% ABV at racking, it should provide some intoxication upon consumption as well.

I got my brew kettle thermometer and I took some pics of the installation so I will be sure to have a post on that in the near future.

Cheers!

Saturday, March 10, 2007

Good day to brew

These are just some notes from my brew day today. One quick thing, I appreciate the comments from Bad Ben with recommendations on the ESP recipe, however I did not follow them. Not because I am an ingrate know it all, but because I brewed before I checked my blog (NEVER AGAIN!!!). I think it will turn out okay in the end though.

  • I used 1.5 qts per pound in the initial mash, making the mash a little over 5 gallons of water. I brought this up to close to 170f and when it was added to the grains, it kept at the 154f I was shooting for.

  • I had my sparge water all ready to go and in the process of lifting it onto my rack, it plug came out and since I was not in the mood to dip my hand it 180f water, I let it drain out. I ended up having to get another 4 gallons or so up to temp for the sparge and I did a batch sparge instead of a fly.

  • I tested the gravity after the first mash and half way through the batch sparge. The mash reading was 1.065 and the last reading was 1.056ish. It ended up boiling down to the 1.060 I was shooting for.
This is a picture of my new brew kettle in action! The rings are a great guide on the amount of liquid you have in the kettle and proved to be pretty accurate. After the boiling and cooling, there wort was up to the middle of the lower ring and I ended up with a little over 5gallons.


This is a picture of the ball valve, no leaks! This is proof that you can do it your self without the weld less conversions. However, after looking at the cost comparison, its a toss up.


Finally, I would normally hook my wort chiller to t normal hose fixture in the basemen (I unhook the washer). However, since my wife was doing laundry, I came up with this solution. Duck tape, the solution to all of life's problems. Reminds me of a quote;

"If it slips, duct tape it, if it's stuck, WD40 it"


Cheers!

Thursday, March 08, 2007

Mother's ESB

This is the beer I am going to brew this weekend. I got the inspiration after reading the blogs of some folks that have left comments, (Bad Ben and Ted I am looking in your direction) I couldn't help myself but to jump on the ESB Express. I was initially going to brew my Belgium Wit, but it has been colder than a bastard in Upstate New York and I like my BW in the sun, so I decided to wait.

So using my handy dandy Designing Great Beers book, I decided to go ahead a design an ESB I will name this weekend. Here goes:

*This recipe was based on 65% efficiency so adjust accordingly

12.69 lbs (5756g) 2 row pale malt
1.05 lbs (476g) Crystal Malt 60L
.45lbs (204g) Chocolate Malt

Boil-2.5oz (70.9g) Goldings 5% AA
Flavor-1.2oz (34g) Fuggle 4.75%AA
Aroma- 2.2oz (62.4g) Mt. Hood 5.5% AA
Dry- 1.5 oz (42.5g) Goldings 5% AA

Wyeast 1028 or 1968 (gotta see what my brew supply has in stock)

OG- 1.060
FG- 1.012

6.5% ABV
48IBU

So I will probably have some adjustments to this after I go to the brewer, but this is what I have so far. Anything seem out of place?

Monday, March 05, 2007

kegged and tasted the Shlitz


So tonight I moved my Schlitz from the garage to the keg and into my stomach. This is my first Lager and next winter I am going to try and get more into these lagers because they are a nice break from the complex flavors of a lot of the Ales that I make. I let this hoss lager for 2 months (new record for me for allowing time to pass without drinking my beer).

Anyway, one of the most gratifying things about this beer is that the first taste rushed me back to my days at the frat house pounding cheep brews out of funnels. The smell was woven into my senses as the first thing I caught a whiff of in the morning. Feet sticking to the floor, digging my books out of a pile of empty beer cups, the great wall of empty kegs...those were the days.

Now I am sure you are reading this wondering "why the hell would you brew something that reminds you of college beer?" and I too asked myself the same question. To be honest, I am not sure, but it's really rewarding to know I can make decent schwag beer.

So here is the official review:

Aroma: This has a sweet malt smell with a distinct maze nose that was the part of the beer smell that reminds me of Natty Light.

Color: I don't have a SRM chart, but I would say it's in the 20-30 SRM range. Its a light gold color that should be more clear than it is (I forgot the Irish Moss).

Taste: Well it's an American Pilsner, what more can I say? This is a distinct corn/maze flavor with sweet malt overtone. There is little to no hop bitterness that jumps out at you, but there is a dry finish that I think is the hops that was in it.

Mouth feel: Light for this style, but I think my kegerator needs to get it's self back on track!

Drinkability: Well it's an American Pils, at about 5% ABV and very light body there is not much to worry about here.

OVERALL: Meh, it's still better than Bud!

Sunday, March 04, 2007

New Brew Kettle Step 2

So after the initial issues I had with cutting the top of the keg off, things actually came together very well in the end. Here is what I did:

After I drilled the hole in the side that was big enough for the 1/2 brass connector piece to fit through, I used the Teflon tape (yea it's pink, so what?) to seal the threads. *I did not use the connector pictured because the non-threaded area in the middle made this too long. The one I used was the same thing only with out the non-threaded area in the middle.


From here I attached the 1/2in brass ball valve I got at home depot with a 3/4in brass washer and a #14 rubber gasket. On the inside of the keg, I used an old 1/2 to 3/4 in piece I had from a cold plate setup I took apart. I used this because with the washer, it was the only thing I had that was going to make the connection tight enough to keep the water from leaking. I used another 3/4 in brass washer and another #14 rubber gasket as well.

Outside


Inside


After a couple of tries with the sealing and re-tightening, I had it with no leaks so I left water in it over night. I also dealt with the sharp edges left from the cutting process with some coarse sandpaper I had left over. This was wood sand paper, but it really did a job on the keg and its all dull around the sides now.


From here is was just a matter of attaching the 1/2" hose barb adapter.


As you can see, this is a huge upgrade in the size of my brewing operation.


I am waiting on the delivery of a thermometer for the keg that I ordered off of eBay. I will be sure to review the product and the seller as well as the installation.

I am brewing with the new setup next weekend so we will have to see how it's going to go.

Cheers.