CNYBrew.com: Homebrew Operation
Showing posts with label Homebrew Operation. Show all posts

Sunday, August 10, 2008

Hops are almost ready!

While my brewing has been a little sparse this summer, the hops have been continuing to grow and in only their second year, look to be doing pretty well!


This is the cascade and fuggles vines. The fuggles on the right is not producing anything, but the cascade is looking great!!!


There are quite a few cones on there and they are coming along nicely. There are some hairs on them, but they still seem small compared to some of the hops cones I see in other pictures. I am thinking that next weekend I might pick a few and dry them because some are further along than others.


This is a nice shot of the head to head between the cascade (on the right) and the centennial. I am quite sure the centennial are ready as they are REALLY smelly and look a lot more open than the cascade. The cascade cone pictured on the right is more mature than most of the others on the vine so I am going to give it more time.


As you can see from the pictures above, the centennial hops did not do as well, I only expect to harvest a few ounces at best with this one. Hopefully next year all hops will be putting out a bigger harvest. I am pleased with this year as a whole though.

Cheers.

Sunday, April 13, 2008

100qt Cooler - phase 1

This time around, Nick wanted to do this "right" so we were going to do this in two phases so as to avoid some of the cobjobbery of the past. The plan here was simple; replace the plug that came with the cooler with a 1/2in ball lock valve and attach that to a PVC false bottom.

Fist off the logic behind PVC over copper. While to date, copper has been the primary false bottom for me, two major factors contributed to the move to PVC - price and workability. Copper has gotten pretty expensive in the last few months so I have been less inclined to use it than in the past. Also, the problems we have had with the soldiering have led me to think that I am not much of a plumber.

With PVC we will glue, cut and puncture with 1/2 of the effort and time of copper. Plus the PVC we got is rated at over 180f so it should hold up without a problem. So we're off:

First off was taking out the plug and putting in the ball valve. It turned out that the hole that was left from the plug was 3/4in instead of the 1/2in we planned on so we used a 3/4in pipe (2" in length) that was threaded on both sided to fill the hole.


We ended up using copper fittings that drew down the 3/4in to 1/2in for the ball valve and for the part that was going to connect to the PVC.


Sealing was obviously a big part of this and it's an imperfect science at best. The key to sealing is to keep an open mind. With this we had a gasket on the inside and one on the outside. It leaked so I removed the one on the inside and used some gasket making stuff and it is now sealed. To test it, I put 5 gallons of water in over night. About 1tbs of water leaked out over the 12 hrs so I figure that' "good enough for government".

Finally Nick built the PVC false bottom. The design is pretty self explanatory and he used a dermal tool to make the cuts for draining holes. All the parts are glued and the whole thing sits inside of the other PVC fitting that is connected to the copper. We are waiting on gluing that until we know that the whole thing is going to work properly.

Saturday, March 29, 2008

Rebuild on my kegerator

Last week the brown mini fridge that cooled my kegerator finally died. This little warrior went through many years of college and then to my cold plate cooler, and finally was the engine to my kegerator. Now it's gone. God's speed little Buddy.


On to the future. My father had a mini fridge that he was willing to donate to the cause, so I decided to give this design another shot. After reading a few kegerator ideas on Adam's blog, I saw this idea where the fridge has the door removed and a fan inside it to circulate the air. After some measurements and a little planning, I decided this was the way to go moving forward.


In the process of taking apart the kegerator, I was able to explore some of the issues that I had had with it, like the fact that it only fit 2 kegs and the tap I hod could work 3 beers. In making room on the sidewall for the new dorm fridge, I was able to make some adjustments to make space for the 3rd keg.


Now three kegs fit into the kegerator. After a lot of time sealing and taping, I have the kegerator down to a steady 47f. I am not sure if the fridge is running constantly, but when I was testing it, it got down to 39f and was kicking on and off so I feel pretty good about the potential for this one.


Finally, because I did not have to mount the fridge on the top of the box, I was able to move the tap back and utilize one of the holes that the fridge used before. This will allow me to have a bar runner on there so that I'm not dripping into a bucket. I know what you're thinking, I decided to avoid the drip tray and go for the bar runner because of the price difference, I am getting a bar runner for $6 with shipping, a drip tray that is big enough for 3 taps is over $50. Plus standing beer stinks no matter what's holding it. IMHO anyway.


In other news, as I've been mentioning on Twitter, our 100qt cooler came in and it was WELL worth the $38 (with shipping) I paid. These things go for over $100 and this one was listed as "used", but it looks pretty new to me. The size difference is pretty staggering - Look at the other two mash tuns I was using next to it.

Monday, March 24, 2008

Big score on kegs!!!

Tonight I hit a big score on kegs. After Bryan - who started brewing with us last weekend - indicated he was wanted to skip bottling all together and go right into kegging because with an easy conversion he could have his kegerator serving homebrew. Because of his need for kegs and my getting close to full occupancy on my current keg supply, I decided to get out and start hunting kegs a little more seriously that I usually do.

I placed a "wanted" ad up on Craigslist offering $10-$15 per keg for soda kegs. Initially I considered trying to trade beer for kegs, but quickly realized that that was not kosher with ATF so halted that. I got a response in the first few days with someone offering 10 to 15 kegs if I was interested. I told him I would take 10 and he asked for $120. Shown below is what I got.


I really lucked out because these kegs were in very good shape. They all still had remnants of soda in them, but for $12 a piece that's what you get.

Tonight I cracked them all open and freed them of the sweet carbonated monster of soda. I started by dumping and rinsing each of them out, sure to keep like caps with one another (some get bent and only create a good seal with the keg they were bent with). After talking with Nick and doing a little research, I decided to give bleach a chance. I used 1.5 cups of bleach per 2 gallons of water on four of the kegs. The other six kegs I used one gallon of one step


My hope is to get a better idea of which is going to work better in the future. However, already bleach and I did not get off to a good start as I think I got some on my good jeans.

Per Nick's suggestion, I pressurized all of them with the cleaning solution in there and I am going to shake them up once or twice a day for the next few days. In the meantime I am going to get some gaskets for the nipples, but not the large cap for the top as I don't think those matter as much. When I get to changing the gaskets, I am going to take all of them apart and clean them out thoroughly.

***UPDATE - After the messages from Trout I went home and dumped all the bleach filled kegs. They were fine and all the soda smells were gone so no harm no foul. The ones that I used one-step with did not work. They still stunk of soda so I made up some of the beer line cleaning solution that I got from Ed a while back and used that for the six kegs that had the One-Step. It worked like a champ! All smells were gone and they are airing out as we speak. It makes the beer line cleaning solution the most desirable solution because it's quick (don't soak it over night because it's capable of stripping chrome and stainless) it's meant for drinking and it's not all that corrosive to the hands or clothes. Win win in my book.

This made for a good night - The bad news is that I think my mini-fridge finally died. I talked to my father and he has an old dorm fridge at the house they are not using that he said I could have so I will be onto other project, but old brown fridge will me missed...


Thursday, March 20, 2008

Oh yea, big grab!


I just won this 100qt hoss on eBay for a steal at $38 with shipping. These things go for upwards of $100 new. This is going to allow us to brew up some BIG batches without the problems we have had in the past.

More to come on this little treasure...

Friday, March 14, 2008

Extra Mash Tun

After brewing outside the capacity of our current mash tun, Nick and I have been looking for a way to build out. After surfing around for a 100+qt cooler, I was looking Craig's List and saw a five gallon water jug for $10. I couldn't resist.

I picked up this hoss with the intention of having it be the reservoir for our sparge, but last weekend, Nick mentioned that with a little work, we could make this guy duel porpoise - mash tun and sparge reserve.


First off, we had to remove the water spout that was on it already. For this model (and most others to my knowledge) it's just a matter of unscrewing the plastic nut on the back and it's off. Easy stuff.


After getting that off, I had widen the hole a little bit to fit the 3/4" ball valve (with threads)through. Don't go too big though, as you want to have as tight a fit as possible. With two gaskets and some silicone, I was able to seal things up (this is a process, but it's worth continuing to do until you get it right). I have a gasket on the outside and one on the inside. On the inside is a plastic nut from my bottling bucket - works great!


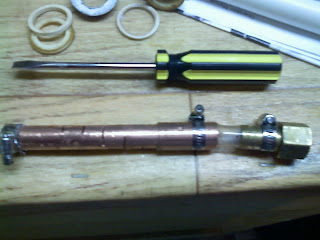
This false bottom was Nick's idea. It's a 1/2" piece of copper tube that has slits sawed into it with a small piece of stainless steal (feed grade from a cheap strainer) on the end. The copper tube is connected to a 1/2" spur via a piece of rubber tube (it was a lot of work to get it over that). All parts are held in place by screw clamps.


This false bottom (1/2" spur and nut) connects to the ball valve (3/4") through a brass 3/4" to 1/2" connection.


So in the end, we have a false bottom for a mash tun using odds and ends pieces I have lying all over. Having a keg system helps me to have a lot of odds and end parts so we were able to make something pretty basic for about $15.

To everyone out there worried about the expenses involved in going all-grain (Adam I am looking in your direction!), here is a way that is cheap - so much so that it will pay for itself in the first batch you do.

Cheers!

Friday, March 07, 2008

Oktoberfest in March

In the true spirit of a Marzen, we are going to be brewing an Oktoberfest this weekend. With hopes of matching the success of the fall 2007 Oktoberfest party, the plan is to brew up 10 gallons of this delicious brew and let it age till late September when we can have friends over to drink it all with us.

The brew is in the spirit of the 2007 Oktoberfest which was a rousing success at our Oktoberfest party;

Recipe Specifications
--------------------------
Batch Size: 10.50 gal
Boil Size: 13.12 gal
Estimated OG: 1.054 SG
Estimated Color: 6.3 SRM
Estimated IBU: 28.1 IBU
Brewhouse Efficiency: 60.0 %
Boil Time: 60 Minutes

Ingredients:
------------
Amount Item Type % or IBU
18.00 lb Pilsner (2 Row) Ger (2.0 SRM) Grain 70.0 %
4.70 lb Vienna Malt (3.5 SRM) Grain 18.3 %
3.00 lb Munich Malt - 20L (11.0 SRM) Grain 11.7 %
1.00 oz Brewer's Gold [8.00%] (60 min) Hops 14.0 IBU
1.00 oz Liberty [4.30%] (60 min) Hops 7.5 IBU
0.50 oz Liberty [4.30%] (60 min) Hops 3.7 IBU
0.50 oz Liberty [4.30%] (30 min) Hops 2.9 IBU
1 Pkgs Munich Lager (Wyeast Labs #2308) Yeast-Lager


Mash Schedule: Decoction Mash, Single
Total Grain Weight: 25.70 lb
----------------------------
Name Description Step Temp Step Time
Protein Rest Add 8.85 gal of water at 128.6 F122.0 F 35 min
Saccharification Decoct 3.98 gal of mash and boil155.0 F 45 min
Mash Out Add 3.50 gal of water at 205.2 F168.0 F 10 min

We will be brewing this Sunday and for the day I have a new toy. In the process of picking up some cheese cloth from Home Depot so that I could use it for dry hopping our Celebration Ale I saw this beauty;

This hos hooks in like a 3/8 drill bit into a drill and is normally used to mix paint, but for us, it will act as our mash mixer. For the $8 it cost me, it was well worth it (assuming it works). The cheese cloth was used as a way to dry hop with out sacrificing a lot of volume. It's a less than perfect solution if you ask me, but it works for now.
I had hoped to run all the wort from my racking cane through the hops into the carboy, but that didn't work. Good idea, but failed just the same.
Finally I had lunch at Empire Brewing Company today and thoroughly enjoyed the smoked porter and saison they had on tap. Great job by Tim the master brewer.

Cheers!

Sunday, February 24, 2008

And the winner is...


Brewing this weekend wound up getting canceled because it was Nick's brew-girlfriend's birthday. Keeping the brew-significant others appeased is ALWAYS a worthy reason to delay a brew weekend. God knows they put up with enough craziness.

With my new found extra time, I decided to take care of a few odds and ends.

$20 Gift Certificate

With the $20 gift certificate that I got for valentines day, there were a lot of opinions on how the money should be spent. It seemed that the funnel was prone to clogging so that was a "no-go", but the stainless steel spoon and the carboy carrier were both winners. So as you can see in the picture below, I got one of each and used the leftover money to get 1lb of extra light DME for my starters.


Racking Samuel Jackson

Even though Nick couldn't dedicate the necessary 5hrs to a brew day on Sunday, he was able to come over and give me a hand racking over my Samuel Jackson. I need a hand lifting things for the next few weeks since my surgery so Nick came over and did a little (much appreciated) heavy lifting for me. He also came baring the gift of home-made pasta that ended up being our delicious dinner.

The Samuel Jackson is going to be a heck of a beer. We dry hopped it in the secondary with a 1/2 oz of Amarillo leaf hops which really gave this a great finish. It tastes a lot like Samuel Adams, but I will wait to give a verdict after I do a little head-to-head. Nonetheless, it's going to be a great beer.

CO2 Stuff

So finally I had to make a run to Lowes to do some "home-owner" duties and on my way, I go right past Harbor Freight so I figured two birds with one stone. Since I made a trade with my brother in law (1 case of cream ale for his 5lb CO2 tank) I needed a regulator for my new tank in order to start using it with the jockey box. I had been eyeing up a dual gage gas regulator that they have there for $34 (such a good price), but wasn't sure if it was too good to be true. Well Saturday I broke down and got it.

As you can see from the picture below, once I figured out that it would work, I decided to put the new regulator on my 25lb CO2 tank instead of the new 5lb one because I use the 25lb tank all the time.

Now with the 5lb tank, since I use the air compressor release fittings, I picked up the necessary parts to have my small tank work with the other parts of my system. With my normal system I used these fittings and had an extra gas ball lock with a hose connected to a air compressor release fitting (male) and my large tank connects to the 4way manifold via a release fitting (female). The manifold has gas shutoffs so I can disconnect the CO2 and reconnect it to the single line.

With my new setup, there are 3 quick releases that will go to 3 gas ball locks and I will be able to power the two tap jockey box plus one other keg. I am officially king of the tailgate.


Even though we didn't brew, I still got a lot done. No complaints here.

Cheers!

Tuesday, February 19, 2008

$20 in brew bucks burning a hole in my pocket

So for Valentines Day, my brew wife got me an AWESOME gift certificate for my LHBS! This is $20 that HAS to be spent on brew supplies. While it's tempting to put it towards a brew session, I decided that I am going to spend it on a few odds and ends items I have been eying there at Ed's.


Since it's $20, I am looking for a little feedback on things that I am considering getting. Here are the contenders:

First up is this 12" funnel with a screen for my buckets (yea I am not rolling in a pre-civil war cotton fortune like the guys at MNB and I still use the modest bucket) - My thought on this is that I have not been crazy about the method that we use for our hops which is steeping them in the brew. With this I would like to filter the wort as it comes out to catch as much of the hops as possible and we could just dump the hops directly into the kettle.


Yea, I know, everyone has carboy handles. Well not me. Since I now have three 5 gallon glass carboys and one 3 gallon glass carboy, I was thinking about not tempting fate anymore and getting some decent handles for them.


The ever important brew spoon. My current brew spoon is plastic and I have been using is for a good 4 years and I think it may be time to retire it. Now on his website Ed only has plastic spoons, but I know he has stainless steal ones at the shop so I was thinking about a 18" stainless steal spoon as another option.


In the end, I am probably going to get all this stuff and just using the gift certificate towards it, why? Why not? I am still interested in hearing some arguments for or against any of the items listed.

Cheers!

Tuesday, January 15, 2008

Jackpot!

So last night on my way home I figured I would make a few stops, one by the redemption center to get some Chimay bottles for my Tripel Nipple and second by Harbor Freight for a wire brush to clean my burner.

I couldn't find the redemption center, so still on a mission, I stopped by my old faithful. Now for the sake of the place, in case their distributors give them a hard time about this, they will remain nameless. Anyway, I go to my super secret location and ask about Chimay bottles, but they have none. However, they do have a "ton of Grolsch flip top bottles" so I ask to have a look. It turns out they also have a ton of Schwelmer flip top bottles as well (amber glass and 11.5oz each as opposed to the larger green Grolsch bottles), 35 to be exact.


I of course volunteered to take all those bottles as well as a Budweiser Brewmaster's Select flip top bottle (you will suffer no more my poor innocent awesome bottle) for the awesome price of $7.50! (To make things better, I get them home and they are CLEAN!!! Nothing inside any of them. All I did was de-label them and they were ready!)

In a good mood, I continued onward to Harbor Freight to get my wire brushes for cleaning my burner. While there, I stumbled on an awesome pack of "pipe cleaning" brushed for $4. I can now lean every crack and crevasse of my beer stuff with a whole variety of tools (yes, it was not an accident to link the word tools to it's definition).


Now as if things could get any better, I got home to find that my brand new refractometer had arrived!!! WOOO-FREAKING-HOOO!!!(my wife thinks I am crazy about being fired up about this, but I don't care, it's bad ass)


So I spent last night de-labeling my clean bottles, playing with my refractometer (contrary to belief, playing with your refractometer too much will not cause hairy palms or blindness, however it will cause awesomeness) and cleaning my burner. For all the stuff I did, it was a pretty easy night.

In other news...

As noted in the picture below, I have some over pressurization on my stout bottles. I don't think that bottle conditioning in growlers is going to work. It's just not been a very good experience to date. I will see how the others turnout, but I think it's a failed plan.

This weekend we are going to be back on schedule and brewing our Sam Adams Boston Lager clone. If anyone knows of a recipe for this one, we are all ears. While there are a lot of clones out there, none of them are alike. Any input would be greatly appreciated.