CNYBrew.com: December 2006

Wednesday, December 27, 2006

First Glass

This is a great brew. I am not saying that it's the be all and end all, but to be honest a little part of me is still fired up when my beer tastes like beer!

Anyway, even though I did not get all of the OG I should have out of the grains that I used, it still has a nice Strong flavor and has all of the characteristics of a good stout. Something I might recommend changing is the hops. There is a stiff hops smell that seems little out of place in a stout. I have always associated stouts with that nice malt flavor and smell (which this has plenty of).

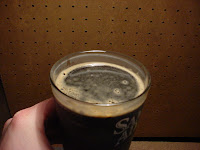
Either way, as you can see from the picture, the head is a nice gold color that does not stay very long, but it's there. The recipe is good and I would that anyone interested in a full flavor stout would like this.

Great YouTube Videos on Homebrewing

I saw these on YouTube and thought they were great. If you have never brewed before, or if you are just starting out, I have always recommended seeing someone in action and this guy have a modest, but thorough operation. He hits all of the high points and I must say, I even saw somethings that are going to make me change a few things I have going on.

Video 1

Video 2

Video 3

Video 4

Video 5

Tuesday, December 26, 2006

Kegged the Yeti


Just a quick note, I took my FG and kegged my Yeti. Needless to say, I have never been one to waste beer so I drank my hydrometer sample and this was what I got from my first taste:

From what I could tell it had a great taste up front. Strong smoky malt flavor but it lacks a finish. The smell was nice, but I am not sure it was fitting of a stout. It has a strong hoppy smell from far away, but when you get your nose right up to it and take a good whiff it has that rich malt smell that you expect in a stout.

Overall I would say (again this is a preliminary assessment) it's a so mediocre example of a stout. However, thats not a bad thing for two reasons; One it was my first shot at all grain, so anything short of a disaster is cool with me and two my friends who are going to be drinking it are hardly what I would call "beer aficionados" though they do consume quite a bit of the bubbly.


My bad on the pics, I should not have drank the sample before I got the camera out.

Carbonating the Keg

So I have been kegging my beer for about a year now and I am still tweaking the process having not found "the ideal" method. I was just reading something on Homebrewmart.com that outlines the force carbonating process pretty well. For this entry I am going to give a brief overview of my method, and some changes I am going to try for this time around.

After the obvious, sanitize, transfer the beer to the keg with minimal aeration, and sealing the top, I start with the CO2. I usually hit the keg with 10-12psi to ensure a good seal and bleed off any O2 (using the valve at the top I let some out and have the CO2 replace the O2 from the transfer). After I have the keg sealed and all of the O2 out, I hit the keg with about 30-35psi until I can tell there is no more CO2 going into the keg.

If you have never done this process before, the way to tell things have equalized inside the keg and there is no more room for CO2 is actually pretty easy, there is no more noise. Once you hear that there is no more CO2 leaving the tank, the kegs got all the CO2 its going to handle.

Next I shake the keg vigorously, I go back and froth, roll it around on the floor, ext. I do this for a few minutes and then hit it with another shot of CO2. I repeat this process 4 or 5 times and let the keg rest for 1/2 hour or so and repeat the process.

After I feel that it's had enough (no logic about the how much on that one, just a shot in the dark), I release the excess pressure from the keg and hook it to the in (CO2 tank) and the out (keggerator) at 10-12psi and leave it over night.

So far the results have been good, not great. I have had a couple of kegs give me trouble and lead em to do the whole process over again. Other times it starts out totally heady and settles about 6-8 beers in. And still other times it's all over the charts.

I would love to get this down to a science so any recommendations are welcome. A quick note would be that the kegs are kept in my basement as a 60-65F temp.

In the end, its still beer and no matter how flat my love is, I still love it.

Monday, December 18, 2006

Learn something new everyday!

So I was reading my handy-dandy "Homebrewing for Dummies" that I bought a few years ago (mine is an older version and I think it's written by someone different) and I saw an interesting tidbit that I didn't realize before. When you are brewing a heavier brew, like an Imperial Stout, you should give it more time in the secondary fermentation than you would with other brews.

Now this is news to me because I was just going on 2 weeks secondary fermentation for everything. According to the book, because these beers are so heavy, the yeast needs a little extra time to work through everything.

Anyway, just a quick update and a reminder to always keep learning.

On a side note- I bought that book before I actually started brewing, I figured that I was going to get to know everything before I went into it like that was going to make me a better brewer, needless to say, I was wrong. If you are thinking about brewing and want to "learn more" my advice is just do it. Watch someone do it if you can, but if you can't, just start screwing around.

*I don't recommend Homebrewing for Dummies, it's confusing, the recipes in it are dated and is really not good for any beginner. However, it does make for a good reference now that I have been brewing for a while.

Wednesday, December 13, 2006

My Operation

This is something that I have been planning on doing for a while now and because I got my digital camera to start putting photo on my computer, here we go:

This is my mash tun set up that I referenced in my posting about the Imperial Stout. As you can see there were somethings that I did differently and I have to say that if I were to do it again, I would recommend keeping it simple.


As you can see, I used a hose type nozzle on the cooler as a way to keep the flow of liquid controlled. The problem with that is it makes the operation needlessly complicated and gives yet another place for a leak to develop. Fact is, the liquid that comes out of the mash tun is all but trickling out and there is no need to have a device capable of stopping water at a higher pressure. That's just me over thinking the plan.


This is my brew corner. I built a corner table out of some used counter top (great because it does not warp from water and beer sitting on it) and some 2x4s. I built it in the corner so that I would be using some otherwise wasted space in the basement (over the sum pump). It have worked out great.


This is my mini fridge kegerator. I took a dorm fridge, drilled a few holes in it and made it into my kegerator. The brew comes from the keg in the back, into a cold plate (that sits in a pan of water to help keep it cool, Pete's idea from the Salt City Brew Club) and out of a tap on the door.

It works pretty well. It does not use a lot of power, keeps my beer cold and is a space saver. Do I dream of more? Of course, but this was a great use of some of my random parts.

As an FYI, I tried using one of the bigger dorm fridges (that you can fit the whole keg inside) but there were a lot of problems. You see the freezer box will freeze the whole keg and the thing never actually worked. It was a disappointment. However, this new little guy is great because I don't even have to get down on my knees to make adjustments.

Anyway, I hope you enjoy. I am going to post some pics from a brew session one of these days.

Thanks.

Monday, December 11, 2006

All Grain- First Stab at it

Well I feel better knowing that it's not as hard as I anticipated. But there are a lot of things that I need to step up in my next round. As I said in a previous post, I plan on updating the bog with an entry that out lines my current setup, but for now I just want to cover a few things that happened during the brewing that worked and that didn't.

First, I was at a loss to figure out how much water to use in the mash. I had heard 1qt per lb of grain, 1.25 qt per lb of grain and a lot of suggestions in between. I used 5 gallons for about 18lbs on grain. That works out to 1.1qts per lb of grain. I am not sure how well this worked, but I was erring on the side of caution because I was not use how much the mash tun I made would hold (it's 48qts and had PLENTY of room).

The temp held great in the mash tun which made me happy. 150F for the full hour, you can't ask for much more than that.

When it came time to run the extract off into the brew pot, I had a bowl that I was using to watch the liquid and get an idea of when it was running without sediment. Well if you take a look at the recipe I was using (Great Divide Imperial Stout) it was DARK and there was no telling if there was sediment or not, so I ran a little out and dumped it back in and just opened it up to the brew pot.

The other thing that I think I dropped the ball on was the sparging. I had about 3gallons of water at 170F and dumped it into the mash tun after the other liquid was run out. I stirred it around for a few minutes and opened it up to the brew kettle. This may have cut down on the OG because I did not give the sparging a chance to work.

Finally, I was not sure where to put the spent grains when I was finished so I dumped them down a storm drain. I don't think it caused any problems, but there has to be a better way. I think I should start composting them.

Anyway, everything else went off without a hitch. The only think that worries me is that there was an OG of 90 on the recipe, but mine was only 50. I think that I sold myself short, though I took the OG from the extract and not from the post boil brew, so who knows if it was as accurate as it normally would be.

I have some ideas for tweaking things for the next all grain batch, but depending on how this one turns out will dictate how many changes I make.

Cheers.

Saturday, December 02, 2006

Yeti (my first all grain)

Ok, so I found this cool mash tun that I made a knock off of and I used as my inspiration to take the plunge into all grain brewing. I am going to put down the details of this Great Divide Imperial Stout, Yeti clone that I got out of Brew Magazine (that my wonderful wife was so kind to get me a subscription for) and I will put a separate entry for the details on my mash tun monster that I built. Cheers- Travis

Great Divide Yeti- Imperial Stout Clone
Base Grain- 15.25 lbs American 2 row malt
1 lb- Crystal Malt
12oz- Chocolate Malt
12oz- Black Patent Malt
10oz- Roasted Barley
8oz- Wheat Malt
8oz- Flaked Rye
1.1oz Chinook Hops (60min)
.55oz Chinook Hops (30min)
.45oz Chinook Hops (20min)
.5oz Chinook Hops (5min)

OG- 1.050
FG-1.005
ABV- 5.85%