CNYBrew.com

Thursday, July 31, 2008

Great Show on The Works

So tonight I just finished watching "The Works" on The History Channel and I have to say...I'm impressed. They toured Smuttynose. and an AB Brewery, an AWESOME homebrewer setup, a can collection for the ages, and a marketing firm that works for AB.

I was really impressed with how throughly they covered the process and even got into cask ales (Stonch would be proud), how the basic keg works, and all sorts of fun.

If you missed this and can catch it on a rerun, I HIGHLY recommend it. It was pretty good.

Cheers

Monday, July 28, 2008

Breaking the Fruit Cap

Since this is my first time doing the whole "Melomel" thing, I have been documenting everything pretty extensively. This whole process requires a lot of doctoring throughout. While I know a lot of people do the fruit in the secondary, I went with the BYO article I saw and fruited in the primary. This creates a dynamic where you need to break up the fruit that collects at the top of the fermentor and allow the CO2 to escape while also introducing some O2 to the mix. I made a short YouTube video of the process:


Pretty interesting stuff right? It's actually pretty easy. I have been taking refractometer readings once or twice a day (when I break the fruit cap) and once I get to the proper gravity, I'll rack over into the secondary. So far it's moved about 10 brix since I pitched it. It's at a pace of 1 brix per day. My goal is 18brix (1.025). At this point, I just need to keep those little guys moving to get there! Cheers!

Friday, July 25, 2008

Fermentation Friday - Dive right in!

The Brew Dudes are holding court on the now regular Fermentation Friday that started at Beer Bits 2. Good stuff. This weeks topic is:

"What advice would you give people that are getting into beer?"

Well for me, it's just dive right in. The biggest mistake I made in brewing was not getting started soon enough. I have learned so much more from doing than I ever had from reading when it comes to beer.

While I think there are some basics it won't hurt to read about, if you have access to a brew club or you know someone that brews, there is so much more to learn from watching and doing that will be helpful. I made the plunge into all grain only after a guy from my brew club invited me over one Saturday to watch. I had been reading about this FOREVER and suddenly I saw it in action. It was a lot easier than it sounded.

I love reading about beer and brewing, but from my experience, there is a lot of extra information that is not needed in brewing. This is really a pretty simple process; hot water, crushed grain, time, hops and yeast. That's it. It's not fusing atoms. Just breaking down complex sugars into simple sugars and letting yeast eat'em.

Anyway, that's my two cents. Hope it helps. Cheers!

Thursday, July 24, 2008

Mellow Meatball


Since my last shot at mead was named after my wife (Christa Meth), I figured it was only fair to name my first melomel after our mellow dog Meatball. So now we have Mellow Meatball.

The recipe was pretty basic as I wanted to get this whole mead thing right for once. Last time around it turned out WAY too dry and tastes like diesel fuel. I figure it can't get worse than that. I "brewed" this up last night (it's such a simple process that it's doesn't feel like brewing at all) and it was bubbling this morning so I think things are going well. Here is what I did, let me know if there is anything out of place:

Recipe
22lbs wild flower honey (bought from the local regional market) $65
20lbs frozen three berry mix (blueberry, raspberry and blackberry) $52
3 gallons of water - free
5tbs of yeast nutrient - had it
2packets of dried yeast (I threw away the yeast pack and didn't write down the type, but it wasn't champagne yeast) - $.89 each


Simple enough, right? I thawed out the frozen berry's in some water and dumped them into one of my buckets. I suddenly realized that there was a ton of extra water and I was concerned that there would not be enough space to have all the honey added so I strained off all the fruit. Once the fruit was strained, I mashed it with my hands to make a chunky puree.

In my second bucket, I sanitized and added the water and honey. I submerged all the honey jars into hot water to loosen up the honey. The honey was pretty loose and I was able to stir it into the water with relative ease. With all 22lbs of honey, there was just shy of 5 gallons of liquid at 1.155. I added that to the fruit and used my drill mixer to aerate the must.

For the yeast, I added both packets to 1/2 cup of water that was at about 106f. After this, I added some of the must to the yeast before dumping the whole thing into the mix. I stirred in the yeast nutrient and the yeast and it was time to cover up. Because the fruit was so close to the top, I decided to use a blow tube instead of a bubbler.

This morning I checked it and it was starting to bubble. According to the reading I have been doing, I am supposed to do something called "capping" which, from what I can tell, consists of popping the bung out once of twice a day to relieve the pressure because of the aggressive fermentation.

More to come on this, but I tasted it last night and it was good! Cheers.

***UPDATE***

I have been taking the gravity and so far it has moved from 1.155 to 1.131. I am also breaking the fruit cap and I will be posting up a video about that soon.

Saturday, July 19, 2008

Red Face V2


It's been a few weekends now, but we brewed up our second round of the Red Face Ale and all went well. Nick and Byran were at my place bright and early for the brew day. This was Bryan's second time really brewing the all-grain way and he seems to be getting it down.

For this brew day, instead of doing two different brews, we decided to just brew one kind and make 30 gallons of it so we could each get 10 gallons of Red Face for our selves. To achieve this, we essentially made a 20 gallon batch and a 10 gallon batch. One interesting note was that with the 20 gallon batch we just used cascade for the flavor hops. With the 10 gallon batch, we used only Liberty for the flavor. I wanted to see what the character of each of the hops was.
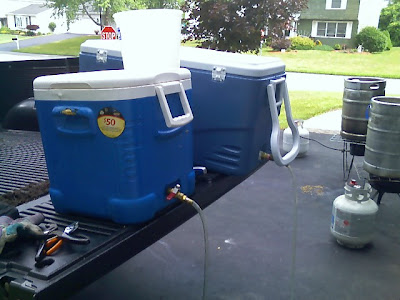
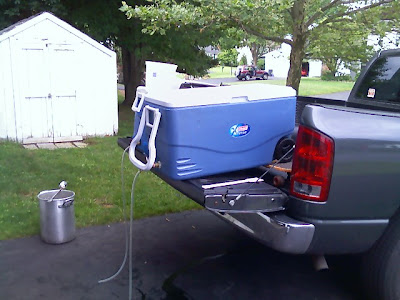

We made some adjustments to the recipe on this one, replacing the black patent with chocolate and using a 45L crystal instead of the 10L. Both of the batches had the same malt profile:

10 Gal
18.5 lbs 2-row US
3.5 lbs Crystal 45L
3.5 lbs Munich
.25 lbs Chocolate
2oz Pearle (60 min)
.55oz Brewers Gold (60 min)
.55oz Amarillo (40 min)
1oz Liberty (1min to cool down)
Wyeast 1056 (American Ale)

20 Gal
Double the grain bill above and replace the Liberty with 3oz of Cascade

Overall it was a pretty good brew day. The OG for the 20 gal batch was 1.054 and the OG for the 10 gal was 1.048 (I forgot why it worked out that way, this is why I usually do my blog posts right after I brew). Both were spot on and yielded 10 gallons for each of us. I have since racked mine to the keg and tasted the two of them back to back.

The 20gal finished with1.014 and the 10 gallon finished with 1.007 so they are pretty close on ABV, but the 20 gallon (cascade) one is noticeably more full bodied. The 10 gallon (liberty) batch has a lighter mouth feel and lacks a lot of the character of the cascade brew. However, it's a lighter more drinkable brew for the summer.

In any event, they are both pretty good brews. I am going to be happy. On another note, I just picked up 22lbs of wild flower honey from the Regional Market. It's Melomel time!

Cheers!

Friday, July 11, 2008

Still here

I have just been working a lot. I am going to post in the next few days about the brew session we had with the Red Ale. All went well with it and it's currently in secondary. In the meantime I have been working on all sorts of random crap. Here is a little overview:

Hops: My cascade hops took off this year! They are blooming as we speak. I had a minor beetle attack with these strange little guys that had shinny shells and they were very slow moving. My non-chemical solution was to burn them. They sat right on top of the leaf so I just took a butane lighter and burned them. They haven't been back since so I guess it worked!

CO2: My CO2 regulator that I picked up from Harbor Freight seems to run with a little too much pressure. If I don't drink for a night, the pressure gets all heady and is way over pressured. It won't go low enough for serving PSI so I switched that one out to the small tank as that one runs beer more steadily in a single session as opposed to my keggerator which will go on and off from night to night.

New Beer: Finally I have been trying a lot of new brews! Empire brewing company has some great beers on tap. There were two great ones that stood out to me; the Saison and the Doppelbock. Both were great. I also had some Cooperstown Brewing Co. "Special Ale" that tasted like a bock (IMHO) that I thoroughly enjoyed. The brew that takes the cake though is the Southern Tier Uber Sun imperial summer wheat. This thing is a really big beer that is smooth and easy to drink. It's a sipper, but not too heavy and does not make you pay in the end.

It's been busy with work, but not too busy to keep track of Monday Night Brewery. Jonathan, I hope you're feeling better. Best wishes in a speedy recovery.

Cheers

Sunday, June 29, 2008

A real blogger party!


Sorry I'm late with this post, but like a good Brew Blogger, this weekend's brewing took precedence over blogging. Fermentation Friday has come and gone, but today I had a stop in by fellow blogger Ted from Ted's Homebrew Journal making this a real brew blogging shindig. Ted's band was out my way for a show near by and we met up at Galeville Country store. We had beer exchange and he was on his way. I have all sorts of cool brews to try out as a result and I gave Ted and the band a quick brew sampling. Fun stuff this brew blogging.

Anyway, back to the subject at hand. Have had a whole bunch of cool submissions for the Fermentation Friday so here we go!

Tony - Brew Dad - Sums up his attempt at a stout-rootbeer-ice cream hybrid
Matt - Sports Beer Wine Life Not in that order - I like the sounds of his "Blood Orange Hef"
Bill - The Panhandle Beer Snob - This is the first I have heard of using tree in your beer
Jon - The Brew Site - I brewed with pumpkin once too and I have to say it's not at all necessary, just use the spices.
Rob - Pfiff - mmmm brandied cherries
Bryon - Home Brew Beer - While I think Hard Root Beer is a bust, the maple syrup beer might be something
Muckney Brewing - I agree, 12 cinnamon sticks IS too much
Jim - Loot Corp 3.0 - Any brew project that can double as a marinade for chicken is crazy in my book
Keith - Brainard Brewing - Brewing with wormwood

And last but not least, the brains behind the day:

Adam :-) Beer Bits 2 - I feel your pain, trial and error is the only way to REALLY learn how not to brew

If I missed anyone, please feel free to email me and I will gladly add you to the lineup. I'm sorry this took so long to post up and I am glad so many people contributed. For anyone wondering if they were "in the spirit of the question" it's all good. I just like hearing about crazy crap brewers try.

Thanks again to Ted for stopping in and saying hi, I hope your show went well in spite of the rain.

Cheers!

Friday, June 27, 2008

Fermentation Friday is here!!!

OK, so here we go with the CNYBrew.com hosted Fermentation Friday. The subject for today kiddies is tell us about the craziest concoction you ever came up with (prepped or on the fly) for brewing. This can include ingredients, techniques and anything else you want to share.

For my fermentation Friday tale, I am going to talk about my "shower head sparge arm". It seems as though these types of project always seem to start with the best of intentions. In my case, I had wanted to make a nice sparge arm for my brewing operation and I was not into buying a fancy rotating head as I am a stingy man.

After several failed attempts at making a simple sparge arm, I was in Mr. Seconds looking for stuff for my house (and of course as always, perusing for potential brewing toys) when, in the bathroom section, I saw a shower head. Suddenly it all came together. It's versatile, mobile, easy to hang, and it will leave a nice evenly spread distribution of sparge water. It was all prefect, then came brew day.

As soon as I hooked it up and started to running the water for the sparge and everything went to hell. It leaked, parts melted, all the gaskets failed and the water ran out of it like it was coming out of a hose. Not the intended even trickling that I had imagined.

While this was not a disastrous problem to fix, I had totally pictured it as a perfect solution in mind. Like a kid who just got his sea monkeys in the mail, only to be disappointed when he adds them to the water, I had another failed sparge arm.

Tomorrow I am going to be posting a listing of all the other brew bloggers out there writing about their crazy ideas...

Wednesday, June 18, 2008

Big racking night

In the face of a crazy work schedule, I have found some sanity in beer. Work can sometimes be SO consuming that even when you're at home, your mind is racing with thoughts of what you would or should have done. Some nights I can't even sleep because there are work issues eating away at me.

Beer is a true escape from all that. When I'm planning (drinking), racking (drinking), cleaning (drinking)or brewing (drinking), my mind is totally focused on beer. It's a great feeling. It's like a little vacation. I think that's why I love the hobby. When you're brewing, you can totally focus on the task at hand and lose yourself in the act. Even when you have people over, all you talk about is beer. It's great.

Anyway, earlier this weekend I took one of my "brewcations" (trademark pending) after work by racking over three of my brews to the keg. I bottled up 8 12oz bottles and 2 bombers (maibock). For the carbonation, I used a little over 1/3 cup priming sugar for the Maibock and just shy of 1/2 cup for the Californication. Using Beer Smith for all of this has been spot on with my carbonation.

I tasted both brews. The Maibock was good, but had a little harsh burn to it from the high alcohol. I think some time mellowing will do that some good. The Californication was REALLY good. The mild malt profile really lets the cascade hops jump out at you. The grapefruit flavor is really distinct and compliments the whole experience. I am pretty pleased with both brews. Should be good brews.

Finally, I picked up four more kegs from my "source" for Bryan. He is really ramping up his brewing operation fast. Good for him!


Friday, June 13, 2008

Fermentation Friday hosted in Syracuse


To follow up on Adam from Beer Bits 2 idea of fostering the beer blogging community by hosting events at our respective blogs, I am going to be hosting the June Fermentation Friday. For a quick review, the idea behind this virtual shindig is that I throw a topic out there and we all combine to lend our own thoughts to the topic on our blog. I will post up a list of everyone that participates on a post and thus the party is on!

So with my opportunity to host the subject, I am going to ask the following:

"What is the craziest concoction you ever came up with, on the fly or prepped, to brew with"

The date for this is going to be June 27th and everyone that blogs is invited (even if you decide to start a blog just to write about your wacky creation). Please email me at travis@cnybrew.com if you are interested in taking part. Even if you don't let me know, if you just write about it, I am going to keep my out on on the Internets for people to fill the tubes with beer projects.

I think I covered everything...Cheers!

Friday, June 06, 2008

Californication round two

This weekend Nick wasn't available to brew, so Bryan and I brewed up hist first batch of all-grain. For this, I wanted to take another stab at my ribbon of participation winning California Common called Californication from last year. This year I made some changes to the recipe and quadrupled the recipe for a 20 gallon batch. Here is the tale of the tape:

Grain

40.2lb US 2-Row
3lb Crystal 40L
3lb Crystal 90L
2.75lb Vienna
2oz Brewers gold (60min)
1.5oz Target (60min)
3oz Cascade (10min)
1oz Cascade (1min-cool down)

Brewing

We struck with 15.3 gallons at 161f for a mash temp of 155f (panned out to 150 at the end due to heat loss on the big tun) and collected close to 10 gallons on the first runnings. The gravity for the first runnings was 21.5 brix (1.090) which was pretty high. After the second and third runnings, the pre-boil gravity was 1.052, well above the 1.045 I was expecting.


One quick note; last time we brewed with this large mashtun, we noted that we were not able to get up to mashout temp because Beer Smith's temps were low for our needs. With that in mind I made some observations this time around and played with the temps:

Sparge 1 - Supposed to be 168f - I used 9 gallons of water at 175f - Grainbed temp was 158f up from 150
Sparge 2 - I used 5 gallons of water at 185f - grainbed temp was 168f making me pretty happy

Lesson learned was two-fold:

First off, we loose about 4-5f every hour we mash (this was a 75min mash). I need to make sure that I overshoot temps with that in mind. Second, when I want to mashout or sparge, 5 gallons at 185 will get me 10f in increased grainbed temp on ~50lbs of grain. Good stuff to know.


Anyway, besides all of that, we would up with an OG of 1.053 (I must be taking my refractometer readings too high because it's not adding up with what I am getting in measured OG at the end) and a very hoppy brew. We used a qt starter of Wyeast California Lager yeast and mine were firing away within hours.


In the end this beer was $38pp for 10 gallons of beer, not too bad. Bryan volunteered to take care of the spent grains because I wasn't sure of a good place to dump 50lbs of wet grain in the suburbs.

It was a damn fine brew day and both of us left happy. We had some burgers for lunch, my wife made some pancakes for breakfast and we hit all our brew milestones. What more is there to say?

Cheers!

Sunday, June 01, 2008

I hope I'm not too late

Adam from Beer Bits 2 came up with this idea to have a blogging party on a mothly basis with other people hosting. We'll in true Travis fashion, I managed to be late. Better late than never I suppose. Here is how I got started with homebrewing:

While in college, I was a frat guy. My friends and I used to drink the Saranac 12 beers of Christmas and talk about what one we liked best. On one road trip out to meet a few alumni, I met this alum named Spike. The guys took us out to the 10 Ugly Men festival (which at the time was only like a year or two old and was nowhere near as big as it is now) to enjoy some of the craft beer Rochester has to offer.

Afterwards we went over to Spikes place and he showed us his basement. I was in awe, he had a pool table and a keggerator with two of his beers on tap! I had never seen anything like it! I remember leaving that place and thinking "this man has the world by the balls". From that point I decided that I was going to know I had made it in life when I had two of my beers on tap and a pool table (I currently have three on tap, but no pool table).

After graduating, while living in an apartment, I started reading about homebrewing and trying to learn all I could before actually taking the plunge. In hindsight I should have just jumped right in because I learned more from brewing than I have ever learned from reading about brewing (especially reading the Monday Night Brewery blog, they're busy playing with toxic bubbles while the big boys are brewing).

Anyway, after a Walmart brew kit that sucked, I decided to go ahead and buy a real brew kit when I discovered EJ Wren (that happened to be like 2 miles from where my now wife lived, coincidence? I think not). I was always pretty damn happy with my extract brews, even with the first couple. Perhaps ignorance is bliss, but I liked them.

As they say, the rest is history. Cheers!

Thursday, May 29, 2008

Tragedy in the brewing world


Late this afternoon, flames were seen coming out of the FX Matt Brewery. While the details of what caused the fire are still unclear, the fire departments are still working to get the fire under control. The Observer Dispatch is reporting on the fire and updating as details become clear. One this that is obvious, this is the loss of a historic brewery and a real tragedy in the brewing world.

The Matt family still own and run the historic FX Matt Brewery that is most famous for Saranac Beer. Matt's Brewery is also responsible for many contract brews, one of the most famous of which is Brooklyn Brewery.

I am TOTALLY bummed out about this, I lived in Utica for three years and thoroughly enjoyed visiting the brewery on Thursday nights. Saranac sponsors the Boilermaker, one of the top rated 15k races in the country, and ends the race at the brewery for an all day party. I can't say enough about how much the Matt family and this brewery mean to the city of Utica and Central New York as a whole.

Our thoughts and prayers are with the Matt family and all of the workers, fire fighters and people of Utica.

Friday, May 23, 2008

Looking forward to more ribbons


Per the request of the Bearded Brewer, here is the ribbon from my previous State Fair Home Brew competition submission. I am looking forward to five more of these bad boys!

Cheers!

Monday, May 19, 2008

The gelatin test - tasting

To follow up on my previous post about the benefits and drawbacks of using gelatin in your brew. For a quick recap, gelatin is a finings, meaning that it is used to remove proteins and some of the "stuff" that is floating in your brew. There is no doubt that it works to clear beer, but now the question is does it impact the flavor of the beer?

For this, I brewed up 10 gallons of ESB and added gelatin to one of the two five gallon carboys during the secondary fermentation. To test the flavor, I have two bottles of this ESB, one with gelatin and one without that I am going to taste head to head. This is what I got:

With gelatin - Clear, off white head, great retention. Aroma is very hoppy with a nice malt stench. There is a smell of rye bread in the nose. The flavor is crisp and intense. There is a lot of bitterness. the flavor leaves quickly and all I am left with is a bitter aftertaste. This is not very sweet at all.

Without gelatin - Color and head are very similar to the other brew, the brew is more cloudy, but it's not that bad. The flavor is a lot more full in the initial experience but the flavor ends very abruptly. There is a lot of hops, it has almost a grassy flavor. There is a little bit more sweetness in this brew compared to the other.

Conclusion - There was not a lot of difference between the two. The color was a huge advantage to the gelatin as it makes the brew as clear as can be. If you like a commercial level of clarity in your brew and don't want to wait 6 months for it to clear out on it's own (it will given time and temp, get as clear as with gelatin), this is not a bad option.

It pretty good news. This is a cool way to make your brew look good and win over some non-believers in homebrew. There was a lot of traub at the bottom of the bottle that had the gelatin in it compared to the one that did not. It stuck to the bottom and didn't come out when I poured the beer.

Hope that helps anyone considering this method. Cheers!

Thursday, May 15, 2008

State Fair Brew Competition

So this year I am putting in my second entry into the NYS Fair brew competition. Last time I entered something in, it was my California Common that scored well, but the advice was that it was a little too "common". Looking back at the recipe, it really was.

Now I know what you are thinking; "I'm not in this for competitions, I in it to make beer". While this is how I feel as well, the feedback that you get it REALLY valuable. Your brews are blind tasted versus other examples of the same style in an effort to decide:

1) Closest to style guidelines
2) Off flavors from brewing process
3) How your beer works as a whole

While most of the folks tasting your beer are generally more "beer geeky" than your average drinker, their also generally homebrews themselves. The feedback you get is generally geared towards constructive criticism. in some cases if you have a bunk beer, they'll let you know. I took a brew judging class for a while and one of the most important things you learn there is to give as complete of a review of the beer as possible to allow the brewer to improve.

It's fun and constructive.

This year, I decided to enter in five beers for review. Listed below are the styles and the beers that I entered (listings are based on the BJCP Guidelines):

Samuel L. Jackson - 3A Vienna Lager
Ongenaet Wheat - 16A Witbier
Sierra Nevada Clone - 14B American IPA
Oktoberfest - 3B Oktoberfest
Kaffir Lime Imperial Lager - 1C American Premium Lager

One of the things you'll hear from people about why not to enter brew competitions is "I don't brew in style". I usually base my beers on the style as the high-low for what I am looking to do. The one brew listed that doesn't fall into that is the Kaffir Lime. That brew has NOTHING in common with an American Premium Lager, other than the fact that it's a lager. However, it's a chance to see what people think about it and to get some judges all ripped up!

Seriously though, it's a great chance to get some unbiased feedback. Some judges suck and don't give you useful feedback, but others will leave you their email and phone number so you can contact them and ask questions.

Cheers!

Friday, May 09, 2008

Little help

So I'm looking for a little help in identifying this thing and trying to figure out what to do with it. A good friend of mine was garage hitting the local garage sale circuit when he came across this. now from the looks of it, it's a wine distributor. It's from a bar in Hamilton and has 8 plastic taps on it. The spurs are all plastic, bit the hammers and other parts on the taps are metal.


As you can see, there is a refrigerator built into the bottom half.
The taps go from the spur into a dip tube that runs through a bung. The bungs share a CO2 in that connects to a gas quick release valve (pretty bad ass to see quick release valves that small).

Each of the units has a mini Co2 regulator that seems to have the pressure regulated by a little turn thing on the bottom. There is a label on the front of both units that says "Premier Cru".

The bottom unit is built around a mini refrigerator, but this is not a home made project, it looks like the freezer in the unit is built much differently than I have seen before. I didn't get a picture, but it's built on it's side.


The door to the fridge has a glass from (double pane) and is totally sealed with refrigerator trim. The door itself seals tight and the fridge still works.


To be honest with you, the whole thing looks like it would work fine. I think the bungs need to be changed, but otherwise it's money. I am just deciding if it's something I can use for beer, or if it's wine only. The other thing I am wondering is if you leave wine on tap that is run with C02, does it go bad?

Tuesday, May 06, 2008

Maibock means May Bock

Nick was out of town so I decided to do a solo batch of maibock using a Munich yeast I had been holding onto for a while. This was the same yeast I used on the Oktoberfest. It's a great yeast and I have the fridge space to do it so I figured 'why not?'.

Anyone not familiar with Maibock I recommend giving one a try. My favorite is the Smuttynose Maibock. It's such a unique flavor. It tastes like you are drinking unfermented wort that is carbonated. Sounds a little weird, but it was honestly the only way I could describe it.

With this beer, I was shooting for an OG of 1.069 to give me a 7%abv brew that would be a smooth drinker with a little kick. The plan is to break this out in the fall (yea I know, May-bock not October-bock) for our Oktoberfest party to go with the OF brew and some brots. Should be a good one.

Here is the recipe:

12lbs German Pilsner
2.25lbs Munich Malt (light)
1.25lbs Vienna Malt
1/2oz Target (60 min)
1oz Liberty (60 min)
Wyeast 2308 - Munich Lager

Process
35min protein rest at 122f (added 4.25 gallons at 133f)
15min Decoction (2 gallons)
45min Rest at 145f
Mashout - 1 3/4 gal boiling - hold at 160f for 10min
Sparge - added 2.2gal of water to mashtun at 168f as wort ran off

The early runnings were 17.5brix (1.070) and the the pre-boil gravity at was at 14 brix (1.055). This was better than the projected 1.051, but in the end, it the gravity was less than the desired 1.069 by showing up at 1.067. Not too bad. It is still plenty in style and should have all the taste I want. The total brew day took about 4 1/2 hrs and was a pretty relaxing brew session. I forget how much more manageable everything is with 5 gallons.

I just checked it tonight and the brew is plugging away in the fridge. I love Munich yeast. Its like a good lineman, it shows up every Sunday and just works. No problems or questions.

Cheers!

Tuesday, April 29, 2008

The Gelatin Experiment


This is the tale of two ESB's. Last brew day we did a 20 gallon batch so both Nick and I had 10 gallons. Coming out of the primary, both were pretty cloudy and lacked any clarity. Having been down this path before, I decided to add gelatin. However, since I had two of the same brews, I figured I would make an experiment out of it!

The idea here was to see if this gelatin stuff really works. For those of you who don't know, there are many who recommend the addition of flavorless gelatin to the secondary or to the keg to allow the beer to clear up. The process is pretty simple, you get some of the flavorless gelatin comes in single use packages. Make up one pack per 5 gallons in a small amount of water (much like priming sugar), let it cool to room temp and add it to the secondary. I have even heard that you can add it to the keg as well (but I've never tried that).

Either way, I decided to give this a head to head and this is what I saw 10 days after the addition:


On the left is the vessel that I added the gelatin to, on the right is the one without. As you can see by the carboy on the left, a lot of the traub that is seen sticking to the bottle is not in the brew anymore and make it clear. One important aspect of this is balance. The gelatin is finings and can have an effect on the flavor of your brew (as it is pulling some of the proteins and what not from the brew). Using this amount has worked for me in the past and I was pleased with the results. The only question I was left with was "does that stuff really make the difference?" and I think this experiment is pretty conclusive.

There are other ways to get similar results like dropping the temp down to the 40's on the brew and giving it a lot of time (this is more safe for the brew to stay in the secondary for a longer time anyway). This is an alternative for anyone that is repulsed by gelatin and what it's made of. Not me though. I am a non-discriminative eater, all animals are fair game on my pallet.

Thursday, April 24, 2008

Bottling Followup


After all of my problems with bottling, I decided to take the advice from some of the folks who so kindly submitted advice. I also spent some time reading back up on brewing basics. Sometimes in the heat of brewing bigger and better, we forget to cover the basics. Well this week was a good review.

What went wrong? Well first off, I'm not real sure. There were several problems; over carbonation, aeration, metallic flavors and made my beer an intense experience.

What did I change? Well just about everything. I now siphon the brew from my secondary into a bottling bucket and add my priming sugar. From here, I sanitize my spoon and give it a light stir to get things mixed up properly. After this, I bottle using the bottling wand that came with my original kit. I rinse my bottles after I sanitize them and before I add brew to ensure that there are no residual films or smells from the sanitizing solution.


Once I am done bottling, I remove the wand and add a hose to the bottling bucket that runs into my keg. This is in hopes of preventing any potential oxidation that could occur in this stage of the brewing. When the bottling bucket is empty, I close the keg and cap my bottles. Done.


As far as my over carbonation, I have moved from the 3/4cup of priming sugar I used to 1/2 cup (unless Beer Smith tells me to use more or less). I also have been using Beer Smith to determine how much to add in times of having an odd amount. For example, I only had two gallons of Alt and needed to bottle condition that. So I added the amount that Beer Smith told me to and it's prefect!


I have to say, it looks as though I may have worked my way through my bottling woes...for now anyway.


Cheers!