CNYBrew.com: 2006

Wednesday, December 27, 2006

First Glass

This is a great brew. I am not saying that it's the be all and end all, but to be honest a little part of me is still fired up when my beer tastes like beer!

Anyway, even though I did not get all of the OG I should have out of the grains that I used, it still has a nice Strong flavor and has all of the characteristics of a good stout. Something I might recommend changing is the hops. There is a stiff hops smell that seems little out of place in a stout. I have always associated stouts with that nice malt flavor and smell (which this has plenty of).

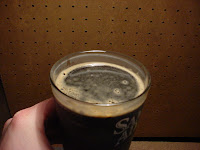
Either way, as you can see from the picture, the head is a nice gold color that does not stay very long, but it's there. The recipe is good and I would that anyone interested in a full flavor stout would like this.

Great YouTube Videos on Homebrewing

I saw these on YouTube and thought they were great. If you have never brewed before, or if you are just starting out, I have always recommended seeing someone in action and this guy have a modest, but thorough operation. He hits all of the high points and I must say, I even saw somethings that are going to make me change a few things I have going on.

Video 1

Video 2

Video 3

Video 4

Video 5

Tuesday, December 26, 2006

Kegged the Yeti


Just a quick note, I took my FG and kegged my Yeti. Needless to say, I have never been one to waste beer so I drank my hydrometer sample and this was what I got from my first taste:

From what I could tell it had a great taste up front. Strong smoky malt flavor but it lacks a finish. The smell was nice, but I am not sure it was fitting of a stout. It has a strong hoppy smell from far away, but when you get your nose right up to it and take a good whiff it has that rich malt smell that you expect in a stout.

Overall I would say (again this is a preliminary assessment) it's a so mediocre example of a stout. However, thats not a bad thing for two reasons; One it was my first shot at all grain, so anything short of a disaster is cool with me and two my friends who are going to be drinking it are hardly what I would call "beer aficionados" though they do consume quite a bit of the bubbly.


My bad on the pics, I should not have drank the sample before I got the camera out.

Carbonating the Keg

So I have been kegging my beer for about a year now and I am still tweaking the process having not found "the ideal" method. I was just reading something on Homebrewmart.com that outlines the force carbonating process pretty well. For this entry I am going to give a brief overview of my method, and some changes I am going to try for this time around.

After the obvious, sanitize, transfer the beer to the keg with minimal aeration, and sealing the top, I start with the CO2. I usually hit the keg with 10-12psi to ensure a good seal and bleed off any O2 (using the valve at the top I let some out and have the CO2 replace the O2 from the transfer). After I have the keg sealed and all of the O2 out, I hit the keg with about 30-35psi until I can tell there is no more CO2 going into the keg.

If you have never done this process before, the way to tell things have equalized inside the keg and there is no more room for CO2 is actually pretty easy, there is no more noise. Once you hear that there is no more CO2 leaving the tank, the kegs got all the CO2 its going to handle.

Next I shake the keg vigorously, I go back and froth, roll it around on the floor, ext. I do this for a few minutes and then hit it with another shot of CO2. I repeat this process 4 or 5 times and let the keg rest for 1/2 hour or so and repeat the process.

After I feel that it's had enough (no logic about the how much on that one, just a shot in the dark), I release the excess pressure from the keg and hook it to the in (CO2 tank) and the out (keggerator) at 10-12psi and leave it over night.

So far the results have been good, not great. I have had a couple of kegs give me trouble and lead em to do the whole process over again. Other times it starts out totally heady and settles about 6-8 beers in. And still other times it's all over the charts.

I would love to get this down to a science so any recommendations are welcome. A quick note would be that the kegs are kept in my basement as a 60-65F temp.

In the end, its still beer and no matter how flat my love is, I still love it.

Monday, December 18, 2006

Learn something new everyday!

So I was reading my handy-dandy "Homebrewing for Dummies" that I bought a few years ago (mine is an older version and I think it's written by someone different) and I saw an interesting tidbit that I didn't realize before. When you are brewing a heavier brew, like an Imperial Stout, you should give it more time in the secondary fermentation than you would with other brews.

Now this is news to me because I was just going on 2 weeks secondary fermentation for everything. According to the book, because these beers are so heavy, the yeast needs a little extra time to work through everything.

Anyway, just a quick update and a reminder to always keep learning.

On a side note- I bought that book before I actually started brewing, I figured that I was going to get to know everything before I went into it like that was going to make me a better brewer, needless to say, I was wrong. If you are thinking about brewing and want to "learn more" my advice is just do it. Watch someone do it if you can, but if you can't, just start screwing around.

*I don't recommend Homebrewing for Dummies, it's confusing, the recipes in it are dated and is really not good for any beginner. However, it does make for a good reference now that I have been brewing for a while.

Wednesday, December 13, 2006

My Operation

This is something that I have been planning on doing for a while now and because I got my digital camera to start putting photo on my computer, here we go:

This is my mash tun set up that I referenced in my posting about the Imperial Stout. As you can see there were somethings that I did differently and I have to say that if I were to do it again, I would recommend keeping it simple.


As you can see, I used a hose type nozzle on the cooler as a way to keep the flow of liquid controlled. The problem with that is it makes the operation needlessly complicated and gives yet another place for a leak to develop. Fact is, the liquid that comes out of the mash tun is all but trickling out and there is no need to have a device capable of stopping water at a higher pressure. That's just me over thinking the plan.


This is my brew corner. I built a corner table out of some used counter top (great because it does not warp from water and beer sitting on it) and some 2x4s. I built it in the corner so that I would be using some otherwise wasted space in the basement (over the sum pump). It have worked out great.


This is my mini fridge kegerator. I took a dorm fridge, drilled a few holes in it and made it into my kegerator. The brew comes from the keg in the back, into a cold plate (that sits in a pan of water to help keep it cool, Pete's idea from the Salt City Brew Club) and out of a tap on the door.

It works pretty well. It does not use a lot of power, keeps my beer cold and is a space saver. Do I dream of more? Of course, but this was a great use of some of my random parts.

As an FYI, I tried using one of the bigger dorm fridges (that you can fit the whole keg inside) but there were a lot of problems. You see the freezer box will freeze the whole keg and the thing never actually worked. It was a disappointment. However, this new little guy is great because I don't even have to get down on my knees to make adjustments.

Anyway, I hope you enjoy. I am going to post some pics from a brew session one of these days.

Thanks.

Monday, December 11, 2006

All Grain- First Stab at it

Well I feel better knowing that it's not as hard as I anticipated. But there are a lot of things that I need to step up in my next round. As I said in a previous post, I plan on updating the bog with an entry that out lines my current setup, but for now I just want to cover a few things that happened during the brewing that worked and that didn't.

First, I was at a loss to figure out how much water to use in the mash. I had heard 1qt per lb of grain, 1.25 qt per lb of grain and a lot of suggestions in between. I used 5 gallons for about 18lbs on grain. That works out to 1.1qts per lb of grain. I am not sure how well this worked, but I was erring on the side of caution because I was not use how much the mash tun I made would hold (it's 48qts and had PLENTY of room).

The temp held great in the mash tun which made me happy. 150F for the full hour, you can't ask for much more than that.

When it came time to run the extract off into the brew pot, I had a bowl that I was using to watch the liquid and get an idea of when it was running without sediment. Well if you take a look at the recipe I was using (Great Divide Imperial Stout) it was DARK and there was no telling if there was sediment or not, so I ran a little out and dumped it back in and just opened it up to the brew pot.

The other thing that I think I dropped the ball on was the sparging. I had about 3gallons of water at 170F and dumped it into the mash tun after the other liquid was run out. I stirred it around for a few minutes and opened it up to the brew kettle. This may have cut down on the OG because I did not give the sparging a chance to work.

Finally, I was not sure where to put the spent grains when I was finished so I dumped them down a storm drain. I don't think it caused any problems, but there has to be a better way. I think I should start composting them.

Anyway, everything else went off without a hitch. The only think that worries me is that there was an OG of 90 on the recipe, but mine was only 50. I think that I sold myself short, though I took the OG from the extract and not from the post boil brew, so who knows if it was as accurate as it normally would be.

I have some ideas for tweaking things for the next all grain batch, but depending on how this one turns out will dictate how many changes I make.

Cheers.

Saturday, December 02, 2006

Yeti (my first all grain)

Ok, so I found this cool mash tun that I made a knock off of and I used as my inspiration to take the plunge into all grain brewing. I am going to put down the details of this Great Divide Imperial Stout, Yeti clone that I got out of Brew Magazine (that my wonderful wife was so kind to get me a subscription for) and I will put a separate entry for the details on my mash tun monster that I built. Cheers- Travis

Great Divide Yeti- Imperial Stout Clone
Base Grain- 15.25 lbs American 2 row malt
1 lb- Crystal Malt
12oz- Chocolate Malt
12oz- Black Patent Malt
10oz- Roasted Barley
8oz- Wheat Malt
8oz- Flaked Rye
1.1oz Chinook Hops (60min)
.55oz Chinook Hops (30min)
.45oz Chinook Hops (20min)
.5oz Chinook Hops (5min)

OG- 1.050
FG-1.005
ABV- 5.85%

Monday, November 06, 2006

Abbey Ale

The Abbey Ale is great. It's strong, no bones about it, but I must say, it has all of the character of a good ale.

Note- I still have yet to master the carbonation of the keg. What has worked for me in the past that is kind of working this time is that I charge the keg (about 30 PSI), bleed out the O2 and I shake it for about 5 min or so. After this, I lower to what I want it to come out at and I connect the CO2 to the keg and then to the tap. I let everything sit for a few days and then start to drink.

Thus far it has produced two results, first it either starts out with a weak carbonation and eventually works it's way to being alright and second, it starts out really foamy and weakens out to a nice carb later.

This is an imperfect science for me, but once I master it I will be sure to make note of exactly what I did.

Monday, October 30, 2006

WOW

Just a note, 9.17% ABV for my "First Tuesday after the first Monday" Abbey Ale, it's going to be great!

Monday, October 09, 2006

"The First Tuesday After The First Monday" Abbey Ale

I went out looking for an Octoberfest brew that I could make with extract. There were a lot of them out there, but the one thing I noticed is that there was no consistancy in the ingredients so I was not sure what made one different from the others. So here I am. I found this Abbey Ale recipie on the internet and made some adjustments to make it my own. Ommegang has a GREAT Abby Ale so if you are interested to get a good taste, thats a great place to start.

Malt Extract: 6.6 lbs Muttons Malt Extract
3 lbs Muttons dry malt

Specialty Grain:
1 lb De Wolf-Cosyns Belgian pale malt
.5lbs Briess Victory Malt

Bitter Hops: 1 oz Czek Saaz (55 min)
Flavor Hops: 1 oz Czek Saaz (5 min)
Kicking it up: 1 oz Czek Saaz (2 min)

Yeast: Wyeast 1214 Belgian Abbey

Special: 1 lb dark Belgian candy- when you add the candy, add it 1/4 of the bag at a time and stir it in. This allows the candy to dissolve)

OG: 1.080
FG: 1.010

ABV: 9.17%

Sunday, August 06, 2006

Cherry Wheat


Now I have never been a fan of the Cherry Wheat's that I have tried (Sam Adams), I think because they use the Cherry Flavoring as opposed to the real Cherry's. Well everyone I have talked too loves the Cherry Wheat so I bucked and decided to make this.

Malt Extract: 3.3lbs Light malt extract (I used Muttons)
3.3lbs Wheat Malt extract (again, Muttons, wish they would sponsor me)
Specialty Grain: .5lbs Crystal Malt

Bitter Hops: 1.5oz Hallertauer (45min)
Flavor Hops: .5oz Hallertauer (10min)

Yeast: Wyeast Weizenbeer Yeast

Special: 8 lbs of frozen sweet cherry's (they are put in during the fermentation, watch for clogging of the bubbler, I used a spill-over tube which consists of a tube connected to the plug where the bubbler goes and it runs into a bucket of sanitized water, worked really well, the fermentation was really intense on this batch)

OG: 1.040
FG: 1.005

Wednesday, June 28, 2006

Fermentation

This is a brewers note:

The primary fermentation for the Orange Blossom Honey Amber was about 5 days. I racked it last night and it smells and looks good. I think that with all of the fermentables this is going to be a strong brew.

The last brew that I did kept fermenting in the secondary fermentation almost up until I kegged it. That was the result of racking too early. This one has not been fermenting at all so I think we are in good shape. No we wait, the hardest part!

Friday, June 23, 2006

Orange Blossom Amber

This is one I found on the internet at Beer Recipes.org and it sounded too good not to try!

Malt Extract: 6.6lbs Muttons Extract
Specialty Grain: .5lbs Crystal Malt

Bitter Hops: 1.5oz Hallertauer (45min)
Flavor Hops: .5oz Hallertauer (10min)

Yeast: Safale S-04 (dry yeast)

Special: 2 cups orange blossom honey (45min)
1tsp Irish Moss

OG: 1.045
FG: 1.005

*Add the Irish moss after 15min of boiling. The honey goes in with the extract. It started fermenting within 12hrs.

Friday, June 16, 2006

Summer Fun!


The Belgium White is flowing!

This is by far my favorite kind of beer, so without a doubt I'm a bias observer. However, the brew recipe I used for this worked out great, it comes highly recommended.

It has a great smell, light fruity hints throughout the brew, and it's even uncharacteristically clear for a Belgium White. I had two of my golf buddies over the other night after a very ugly night at the links. It was named the "Mulligan Witte" because it was a Mulligan for our whole night.

If you are looking for something summer, smooth, easy to drink, this is a great option.

For anyone in the brewing side of things, it was OG 1.045, and FG at 1.011, Making it a hair under 5% abv. The grains of paradise really stand out in the aroma, but the orange peel is pungent in the flavor. It was in the primary fermentation for about 1 week, and in the secondary for over 2 weeks. I racked it too early and it fermented in the secondary for just about the whole two weeks.

Good luck.

Saturday, May 13, 2006

Blanche de Bruges (Belgium White)

This was a mix I got from Ed at EJ Wren, there are a lot of extras in this one and I have to say the are all good.

Malt Extract: 4lb Alexander's wheat Malt Syrup (60% wheat and 40% Barley)
Specialty Grain: 4oz flaked oats
3oz Belgian biscuit Malt

Bitter hops:
1oz Styrian Goldings (45 min)
Flavor Hops: 1/2 oz Saaz (15min)

Yeast: Belgian White Beer Yeast- liquid

Special 1/2 lb Belgian clear candy sugar (45min)
*1tsp ground coriander (15min)
1oz bitter orange peel (1/2 15min, 1/2 at 3min)
1/4tsp crushed cumin seeds
1tsp crushed grains of paradise

OG: 1.045 (range 1.048-1.049)
FG: 1.015 (1.009-1.010)

*I did not use this, but it was part of the mix.

I brewed this for just under an hour and it fermented in the primary for about 3 or 4 days before slowing down. It smells really good I can't wait to try it!

Wednesday, April 05, 2006

New Life

This is my first post since moving into my new home. I am in between batches (still nursing my English Brown Ale), but I have been continuing on in a brew tasting class where I have learned about a lot of new brews.

I think my next batch will be a wheat beer, maybe a Belgian.

I will post more as I start to put together my new home brew setup.

Monday, March 20, 2006

Value of Age

Well lesson learned.

I let the English Brown Ale that I was previously not satisfied with age on the CO2 system (about 8psi) and I must say, the improvement is noticeable.

The beer has a full consistent carbonation, the smell has a overwhelming sent of brown sugar and the flavor is mellow and smooth with a sweet after taste. I wouldn't call this an award winning beer by any stretch, but I will say that I am more than willing to drink it and enjoy it. After all, that's what really matters.

Lesson; if at first you are not satisfied, let it sit, can't hurt.

Monday, February 27, 2006

Needs Work

It has been about a week since I tapped my English Brown Ale and I must have done something wrong because there is no way that it is supposed to taste like this. First off it's watered down so all you get is a faint taste of beer. Second, it lacks many of the characteristics that a good ale should have, there is almost no hop flavor and a total lack of bitterness.

As far as the things that I did wrong to make this batch the way that it is, well I am not sure where to begin. First off I don't think that I cooked it long enough which would contribute to the watered down taste. The recipe called for brown sugar and since I forgot to add it in the cooking, I added it before the second fermentation. There were two reasons for this, first, I did not get much bubbling from the primary fermentation and I thought some sugars might help fire up the yeast and second, I read somewhere that you can do that if you boil the additive before adding to the brew.

Finally I have been having continuing problems with the CO2 system that I am using. It has already caused me to over carbonate some brews and under carbonate other, but nonetheless the same thing remains, they all wind up flat.

Needless to say, there are some aspects of my system that need to be improved, but like they say "That is why they play the game"

Sunday, February 19, 2006

All Grain


Saturday was my first introduction to the process of all grain brewing. I have to admit that I was really intimidated before I saw the system in action. I made some mental notes about the process and below is the process as I observed it:

Cracked not crushed grains
The grains should be cracked open, but not crushed. The best way to do this is to put the grains in zip-lock bag and cracked with a rolling pin.
1lb Grain-1qt water
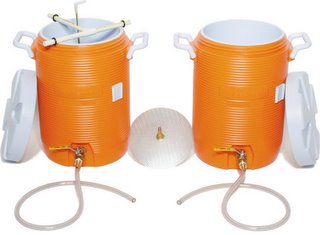
Using a orange water jug (like the ones that they use in sports) all of the grains are added. The ratio of grain to water is one quart to every pound of grain.
152 degrees
The water needs to be brought to 152 degrees and added to the grains in the water jug. The temp is important because you want the grain to open up and produce sugar, but if the temp goes too far over 152, they will produce tannins which leads to a bad taste.
1 Hour
The grains should stay in the hot water for about an hour. This will allow the cracked grains to release into the water. If the jug is insulated that you are using, there should not be to much of a significant change in temp during the hour.
Sparging
This is a weird word for basically washing the grains. You see, the grains have releasing the sugars as they would in the growth process. By trickling water over the grains, you are washing all of the sugars off of the grains in into your wort.
Transfer
Using a modified spout on the jug, release the malt (the water that has been in the jug with the grains) into your boiling pot. It is helpful to have the boiling pot that you are going to cook your wort in on the heat already, this will make the cooking of the wort a little faster because you are not going to be trying to bring 5 gallons to a boil.
Proceed
After all of these steps, you continue on with the process of home brewing as you normally would with extract. Since you included all of your grains in the "all grain" method, there is no need to do anything with the specialty grains (they are in the malt). Just boil for an hour, add your hops as the recipe calls for it, pitch, ferment, bottle and enjoy!

Wednesday, February 15, 2006


10 Ugly Men Fest in Rochester, maybe 4 years ago now. Justin, Miah, Poop, Squank, and Me. Posted by Picasa

Pugnacious Porter


Malt Extract: 3.5lbs John Bull Dark, 4lbs dry amber
Specialty Grain: 1lb 90-L Crystal malt, 3/4lb Choc. Malt
Bitter Hops: 2oz Northern Brewer (45min)
Flavoring Hops: 1oz Foggles (20min)
Finishing Hops: 1/2 oz Foggles (5min)
Misc: 1 hand full of anise seed (enough to cover the palm of your hand)
OG/FG: 1.055/1.015
Primary: 6 days 58-66F
Secondary: 15 days 58-66F

Notes: The black licorice flavor was a little strong, next time use a little less. It was a very dark and very strong brew. The taste was great!

I did let the specialty grains sit in water that was hotter than it was supposed to. The rule is that you are supposed to have the SG in the water for about 1/2 hr before the water reaches a boil. I did not notice much of a difference, but the flavor of this brew was strong so I doubt you would notice something like that.

It was a kicker of a brew, three beers and you are giddy.

Granddad Brown Ale


Malt Extract: 5lbs John Bull Light
Spec. Grain: 8oz 40-L Crystal Malt, 2oz Black Patent Malt
Bitter Hops: 1oz Saaz, 1/2 oz Hallertaver (45min)
Finishing Hops: 1/2 oz Hallertaver (5min)
Yeast: Whitebread Ale (liquid)
Primary: 7 days 55-61 degrees
Secondary: 10 Days 63 degrees
OG/FG: 1.040-1.050/1.008-1.014
Misc: Brown sugar boiled in with 1pt of water, introduced before secondary fermentation. Molasses is also something that can be added, preferable in the wart with the boil.

Notes: Late fermentation, it took about 32 hours to start fermenting, and I had to bring the brew to about 63F to get it moving. Temp increased to 66F and the fermentation picked up.

I think that the problems spawned from a bad pitch, I had not given the yeast enough time to wake up from the cold.

I introduced the brown sugar before the secondary fermentation (I forgot to add it during the primary), I would not recommend this as a normal practice because all of the additional activity will keep the brew from clearing up the way that you want.

Monday, February 13, 2006

Welcome!

This is my blog about home brewing. I am going to be using this blog as a way to log in my recipes and comments about home brewing. I am fairly new at the "home brewing scene" (about a year or so, maybe 12-15 batches under my belt), but I really enjoy it and I thought that a blog might be a good way to keep my information in order.

If other people read this, awesome, I hope it helps. If you know more than me, please feel free to comment. Cheers!